
Installation guide


Converting a Single-Host Configuration to a Dual-Host Configuration C–19
C.2.4 Power up the SF200 Storage Array
Now that the SF200 storage array has been converted to dual-host and
labeled you are ready to apply power.
CAUTION
Ensure that the ac power switch on each SF72 storage enclosure
and magazine tape subsystem installed is in the off position.
1. At the rear of the storage array, turn the 881 power controller on.
Ensure that the BUS/OFF/ON switch is in the down position.
2. At the rear of the storage array, turn on each magazine tape
subsystem installed (if present). Power up position 5 and then 6.
Observe the front panels for any fault indications.
3. At the rear of the storage array, turn on each SF72 storage enclosure
starting with position 1 and following in numerical order.
4. Depress each drive dc power switch for each SF72 storage enclosure.
Start with position 1 and continue in numerical order.
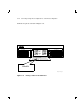
5. Observe the OCP indicators. Refer to Figure C–9.
a. Check that the TERM PWR LED (located behind the door of the
OCP) is on for all positions installed.
b. Check that the SPLIT LED (located behind the door of the OCP)
is off for all positions.
c. Ensure that all DSSI ID switches on all OCPs are set to left-rear
(ID=1), left-front (ID=2), right-front (ID=3), and right-rear (ID=4).
6. Depress the Ready button on the OCP. Refer to Figure C–9. The green
Ready LED will flicker then light steady once the ISE is on-line.