
Installation guide


C–6 Converting a Single-Host Configuration to a Dual-Host Configuration
C.2.1 Split-Bus to Through-Bus Conversion Procedure
Use the steps in this section only if you are converting an SF72 storage
enclosure resident in position 3 or 8 of an SF200 storage array from
single-host to dual-host. SF72 storage enclosures in position 3 and 8
MUST be converted as split-bus mode is NOT supported in the dual-host
configuration.
CAUTION
Maintain ESD precautions at all times. Before performing any of
the following steps locate the ESD strap located in the ESD pouch
at the bottom of the front door.
To maintain stability, only one SF72 storage enclosure or
magazine tape subsystem should be extended on the slide mounts
at a time.
1. Remove the OCP by firmly grasping the right and left side of the OCP
and pulling the OCP straight off.
2. Loosen the four captive slide assembly screws. At the rear, push inner
assembly out until drawer locks in the service position.
NOTE
Do NOT completely remove the SF72 inner drawer assembly
from extrusion tube.
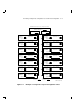
3. Reconfigure the TTM for through-bus mode by first moving the small
black jumper to the through-bus terminals. Then move the cable
connector from J3 to J5, and the cable connector from J2 to J4, as
shown in Figure C–2.
4. Push the SF72 inner assembly back into the extrusion tube. To
prevent pinching any cables, be sure that all cables are dressed
correctly.
5. Tighten the four captive slide assembly screws.
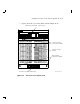
6. Set the DSSI ID number switches located behind the OCP front door
of positions 3 and 8 to match those located in positions 1, 2, 4, and 7
(refer to Table C–1).
7. Replace the OCP by lining up the taps on the back of the OCP with
the slots on the front of the storage enclosure. The firmly press in on
the right and left side of the OCP.