
Installation guide


Installation Troubleshooting 7–15
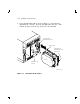
7.1.2 Bringing the RF72 Disk ISE On-Line
This section provides the procedure for bringing all the ISEs in the SF72
enclosure on-line and for setting DSSI ID numbers.
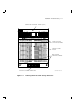
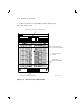
1. Ensure that the DSSI ID switches (behind the door on the OCP) are
set correctly. For positions 1, 2, 4, and 7, they are LR:1, RR:4, LF:2,
RF:3. For positions 3 and 8, they are LR:6, RR:6, LF:5, RF:5.
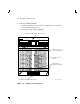
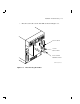
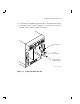
2. Place the ac power switch at the rear of the SF72 enclosure to the 1
or ON position.
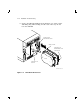
3. Press all drive dc power switches.
4. Press all four Ready buttons on that OCP, one at a time.
5. If no Fault indicators are lit, then continue. If a Fault indicator is
lit, recycle the dc power once. If the failure appears again, refer to
Section 7.1.1.
6. Run the EVCXE or EVCXF programs to add the new disk ISE to
the configuration and to change any disk ISE internal parameters, if
necessary.
7. Update the system configuration sheet.
8. Run DRVTST and DRVEXR (under DUP) to verify the correct
operation of the new disk ISEs.
9. Return the system to the user.
7.2 Troubleshooting the Magazine Tape Subsystem
Refer to the magazine tape subsystem documentation for troubleshooting
information.