
Installation guide


7–10 Installation Troubleshooting
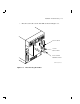
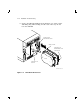
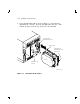
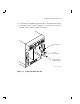
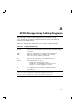
d. Remove the RF72 disk ISE as shown in Figure 7–4. Slide out the
disk ISE gently, while holding all cables out of the way. Do not
force the disk ISE.
NOTE TO
ILLUSTRATOR:
front panel for this
hardware is SHR_X1127_89
ISOL and reduced
17/64 (.265625)
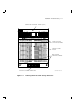
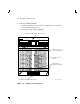
Write
Protect
Fault
DSSI
ID
Write
Protect
Ready
Fault
DSSI
ID
d
i
g
i
t
a
l
Ready
NOTE TO ILLUSTRATOR:
This was created by
rotating SHR_x1074A_89_SCN
RW,Z120
SHR-X0128-90-SCN
THIS REPRESENTS
A RF72
SHR-X0135-90
SHR-X0136A-90
RF72
SKID PLATE
RETAINING CLIP
SKID PLATE
SKID PLATE
RETAINING TAB
LOCATION
SKID PLATE
GUIDE
Figure 7–4 RF72 Disk ISE Removal