
Installation guide

Installing the SF72 Storage Enclosure in an SF200 Storage Array 5–15
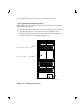
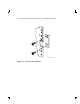
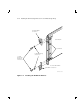
2. Install the slide mount and associated hardware (Figure 5–6).
The slide mount has two parts. One part is called the ‘‘adjustable’’
end and the other is called the ‘‘slotted’’ end. The adjustable end has
four screws that, when loosened, allow the slide mount to be placed in
the cabinet and then extended to make a secure fit.
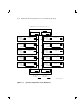
When installing the slide mount in positions 1, 3, 5, and 7, install the
slotted end in the front left cabinet frame rail. When installing the
slide mount in positions 2, 4, 6, and 8, install the adjustable end in
the front right cabinet frame rail. The number for each position is
labeled on the right and left cabinet frame rail on the front and the
rear of the cabinet.
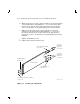
a. Loosen the four screws in the adjustable end of the slide mount.
b. From the front of the cabinet, place the slide mount in the cabinet
so that the stamped UP and arrow are visible.
c. Align the guide pin with the X stamped in the cabinet frame rail.
d. Install one 7/16-inch shoulder screw and washer (hand-tighten) in
the center threaded hole of the slide mount.
e. Install the opposite end of the slide mount into the rear cabinet
side rail. Again, align the guide pins with the X on the rail.
f. Install one 7/16-inch shoulder screw and washer (hand-tighten) in
the center threaded hole of the slide mount.
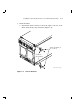
g. At the rear of the cabinet, install two 1/2-inch shoulder screws
with washers and the DSSI cable retainer clip. Note that the
DSSI cable retainer clip must always point away from the center
of the cabinet.
• Place a 1/2-inch shoulder screw with a washer through the
upper hole of the DSSI cable retainer clip and install the
screw (hand-tighten) in the top threaded hole in the slide
mount.
• Place the other 1/2-inch shoulder screw with a washer through
the lower hole of the DSSI cable retainer clip and install the
screw (hand-tighten) in the threaded hole in the slide mount.