
Manual

Network
Setup
-
DW
Desktop
Tool™
1
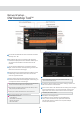
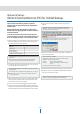
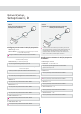
Run the CD included with the camera and click on the DW
Desktop Tool™ file.
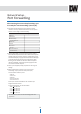
2
The software will scan your network for all supported
cameras and display the results in the table. 'Allow up to 5
seconds for the IP Installer to find the camera on the
network.
3
You can press the 'Refresh List' to search the network
again, or filter the search results by entering a value in the
filter box at the bottom of the page.
4
Check the box next to 'Display Camera Thumbnail' to view
a JPEG image of the camera's view next to the camera
name on supported models.
5
Select a camera from the list by double-clicking on it. The
camera's network information will appear. If necessary, you
can adjust the camera’s network type.
7
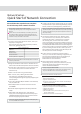
To view the camera's web client, click on 'View Camera Website'.
8
To save the changes made to the camera's settings, input ID and
PW of the camera for authentication.
9
If the camera needs to be rebooted after the settings were changed,
press the 'Reboot' button. The camera will power cycle and will
appear back in the search results once the reboot is complete.
10
Click ‘Save’ to save changed values.
11
To update the camera's firmware from the DW Desktop
Tool™, click on the firmware tab, upload the firmware file
and select the cameras to update. You can update multiple
cameras at the same time.
D
efault
ID
/
PW
:
admin
/
admin
A
‘P
or
t
F
or
w
ar
ding
’
has
t
o
be
set
in
y
our
netw
or
k
’
s
r
out
er
f
or
external
access
to
the
camera.
D
efault
T
CP/IP
inf
or
ma
tion
- IP
:
192.168.1.80
-
Subnet
M
ask
:
255.255.255.0
-
G
a
t
ewa
y
:
192.168.1.1
-
DNS
:
168.126.63.1
6
The
camera's
default
network
information
is:
S
elec
t
DHCP
if
the
in
t
er
net
ser
vic
e is
dynamic
I
P
.
T
his
will
allow
the
camera
to
receive its IP
address
from
the
DHCP
server.
Select
STATIC
to
manually
enter
the
camera’s IP address,
subnet
mask, Gateway
and
DNS
information.
Contact
your
network administrator
for
more information.
12