
User Manual


13
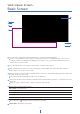
Web Viewer Screen -
Basic Screen
The web viewer is optimized with Internet Explorer 10 (or above) and Mozilla Firefox.
“If VLC is not installed or the VLC plugin is not supported (Chrome), ‘Live Buffering’ and ‘Channel Select’
(subjects 3 and 4 in the diagram) will display as ‘Live Viewer’. If so, select HTML5 (MJPEG) from the Live
Viewer menu to view the video.
1
Live video display. This is the region for the live video stream from the camera.
2
Setup a popup button. Click it to open the Setup page to setup details of IP camera like Video, Network,
Events, System, etc. See the section ‘Setup’.
3
When the image is not smooth due to a bad network connection, it stored image during setup time and shows
the image on the live view screen.
Users will see the delayed images based on the set delay time.
4
Channel Select button. Select a stream produced from the camera between Stream 1 ~ 3 to display it in the live
view screen.
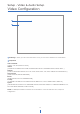
Refer the ‘Setup > Video & Audio > Video’ to setup the Video Stream.
5
Below “Menu” is supported per models.
6
Motion - Shows the motion event status.
Event Alert Icon ( ) appears if ‘Motion Detection’ is activated.
7
Camera Time - Display the camera time.
PTZ control - Not supported.
Preset - Not supported.
Speaker control - Not supported.
Alarm input - Not supported.
Relay out - Not supported.
2
3
4
5
6
7
1