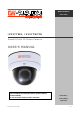
USER’S MANUAL Network Camera User’s Guide iV3377WD, iV3377WTIR V a n d a l P r o of IP D om e C a m er a USER’S MANUAL Before installing and using the camera, please read this manual carefully. iV3377WD / Be sure to keep it handy for future reference.
USER’S MANUAL FEATURES 1/3‖ Sony Super HAD II CCD 560 TV Line OMNI-Focus 2.9~8.5mm, 3X Motorized Zoom, Auto Iris Easy Icon Driven OSD Menu with Built-in Joystick Power over Ethernet [PoE] IEEE802.
USER’S MANUAL FEATURES OF NETWORK H.
USER’S MANUAL PRECAUTIONS Do not open or modify. Do not open the case except during maintenance and installation, as it may be dangerous and cause damages. Do not put objects inside the unit. Make sure that no metal objects or flammable substances get inside the camera. It could cause fire, short-circuits or damages. Be careful when handling the unit. To prevent damage, do not drop the camera or subject it to strong shock or vibration. Install away from electric or magnetic fields.
USER’S MANUAL TROUBLESHOOTING Before sending the camera out for repair, check the items below. If the problem persists after checking these items, contact your service center.
USER’S MANUAL DIMENSION (mm) iV3377WD / iV3377WTIR 6 / 60
USER’S MANUAL INSTALLATION 1. Use the supplied L-wrench to remove the four fixing screws (B) of dome cover (A). E F 2. Align the camera unit with the surface of the ceiling; make marks on the ceiling in the places where the screw holes are to be drilled; and D then drill the four holes. 3. Cut a hole (diameter 2.9in/0.73mm) in the ceiling for routing the cables. 4. Pass the power cable (E) and LEN cable (F) from the camera unit through the cable hole in the ceiling. 5.
USER’S MANUAL CONNECTION ▲ CONNECTION (Ⅰ) DC12V / AC24V LAN (RJ45) Power Requirement: 12VDC @ 2A 24VAC @ 1A Second VIDEO PoE Switch (IEEE802.3af) CAUTION: Check for polarity when using a DC voltage. ▲ CONNECTION (Ⅱ) LAN (PoE) Second VIDEO CAUTION: Check for polarity when using a POE (Power of Ethernet) power supply.
USER’S MANUAL ▲ ETHERNET CONNECTION Connect Ethernet Cable to the network.
USER’S MANUAL CAMERA SETTING ▲ LENS ADJUSTMENT & GIMBAL ADJUSTMENT 1. Adjust the panning (360˚) and tilt (90˚) position. (DV LENS TYPE) Adjust the panning (360˚) and tilt (70˚) position. (DV LENS & IR LED TYPE) 2. Set the zoom lever as desired position by moving Zoom lever. 3. Set the Focus lever as the image is focused by moving Focus lever.
USER’S MANUAL ▲ GIMBAL ADJUSTMENT 1. Adjust the panning (360˚) and tilt (90˚) position. (OMNI-FOCUS LENS TYPE) 2. Adjust the panning (360˚) and tilt (70˚) position.
USER’S MANUAL ▲ CAMERA SETTING FOR SIDE OSD CONTROL BOARD SW1 SW2 CON1 FUNCTIONAL OF CONTROL BOARD [1] Functional control of O.S.D (On Screen Display) (SW2) [2] Functional of VIDEO OUT (2ND) (CON1) [3] Functional when using PAN FOCUS LENS [OPTION] a) You push SW1 for 2 seconds. Then the function of SW2 changes from OSD control key to zooming control key. b) You press SW1 again for 2 seconds. c) At this time, the SW2 function switches from zooming control key to OSD control key.
USER’S MANUAL ▲ REMOTE CONTROL Instructions: 1) Press [KEY] button + [ID]. Default is ―001‖ for ID=1. 2) Point the remote control towards the camera, then press and hold [0] until the Red LED light starts flashing. 3) Press and hold the [KEY] button, until LED turns a solid Red color. 4) Press the [+] button to ZOOM IN, and [-] button to ZOOM OUT. 5) Press the [Ent] button to access the Menu and press [KEY] button to exit. 6) Press the [9] button to turn the Alarm ON or OFF.
USER’S MANUAL ▲ OSD MENU SETTINGS - iV3377WD, iV3377WTIR Series EXPOSURE LENS DC (0-100) / MANUAL / VIDEO DC Lens is recommended. SHUTTER 1/160 / 1/100 / FLC / 1/250~10000 / SENS-UP x2~250 BLC Back Light Compensation OFF / ON AGC Auto Gain Control HIGH / MIDDLE / LOW / OFF MAX-DR Electronic Wide Dynamic Range OFF / ON (0~20) STAR-LIGHT AUTO (x2~x250) / OFF x32 is recommended.
USER’S MANUAL MOTION MOTION EXIT JUMP OFF / ON SET WINDOW ALL SET (Set the Entire Screen) ALL CLEAR (Clear the Entire Screen) SENSITIVITY (1~120) SHOW INDICATOR (OFF / ICON / TRACE) DELAY OUT (1~15) Motion Alarm Zoom-In Delay EXIT / SAVE&EXIT / FACTORY SET SYNC V-PHASE EXIT JUMP INTERNAL / AUTO 0~199 EXIT / SAVE&EXIT / FAVTORY SET EXIT SAVE&EXIT FACTORY SET Exit the menu. Exit the menu and save the settings. Reset the menu setting to factory default.
USER’S MANUAL NETWORK CONFIGURATION ▲ INSTALLATION PROCESS 1. Connecting power supply, LAN, and audio cables to an iV3377WD (iV3377WTIR). DC 12V - Power (Adapter, DC 12V/1000mA) ETHERNET - LAN cable (RJ45 Jack) A client PC or a network device is connected to the iV3377WD/iV3377WTIR.
USER’S MANUAL 2. Executing NVR program Installation on PC (Ex: NVS 4.1 Installation) On each installing process, click [Yes] or [Next] to install by default. The programs like ENCP, NDC Manager, and NDC Viewer are installed after the entire process. ▶ NVS 4.1 Installation 3. Assigning an IP address to the iV3377WD/iV3377WTIR. Assign an IP address with ENCP 2.0 Running Start > Program > NVS 4.1 > ENCP 2.0 ▶ ENCP 2.
USER’S MANUAL 4. Scan iV3377WD/iV3377WTIR and network configuration Click [Scan Cameras] button to search iV3377WD/iV3377WTIR Network Video Streamer on the local network where ENCP runs. The Camera List displays the basic information of the searched iV3377WD/iV3377WTIR on the local network. Default IP address is 192.168.1.2 Select an iV3377WD/iV3377WTIR and change the network setup appropriately. After the setup, click [Save] button. Refer to ―ENCP 2.0‖ manual for details. 5.
USER’S MANUAL Using Web Browser ▲ OVERVIEW User can monitor the video and audio data and manage iV3377WD/iV3377WTIR through a web browser over internet. User can select a type between encoder mode and decoder mode through a web browser. Basic Functions: Monitoring Monitoring the video and audio data from an iV3377WD/iV3377WTIR. Changing the setup related to monitoring Resolution, Info. Display, D/O (Digital Output), Bit Rate, Audio, PTZ, etc.
USER’S MANUAL ▲ CONNECTION To connect to an iV3377WD/iV3377WTIR, type the IP address that is given to the iV3377WD/iV3377WTIR on the address window of a web browser as below. (Refer to ―ENCP 2.0‖ program manual to set IP address of the iV3377WD/iV3377WTIR.) http://(iV3377D/iV3377TIR IP Address) ► Type on the address window of a web browser and enter http://192.168.1.
USER’S MANUAL Client’s IP : Displays the IP address of the connected PC.
USER’S MANUAL • Note for Monitoring Page When first connecting to the monitoring page, click [Yes] to download ActiveX if ―Security warning‖ window appears. (CASE ①) ① ② Click the yellow information bar to download ActiveX control. User can download and install ActiveX Setup manually if the information bar does not appear.
USER’S MANUAL Click [Run] button to install ActiveX file manually (NVSOCX.
USER’S MANUAL ▲ MONITORING Monitoring Page 1st / 2nd / 3rd Stream Select a Stream to monitor If the stream button is inactivated, check the video setting of ―server setting page.
USER’S MANUAL Full Extend the image of current video stream to fit monitor size. Resolution Display a current resolution. User can select other resolution. If iV3377WD/iV3377WTIR is rebooted, the resolution on the monitoring page is initialized to the designated value of ―server setting page‖. Changing the resolution is not available on a guest account.
USER’S MANUAL D/O Digital Out - This controls the device that is connected to the iV3377WD/iV3377WTIR. Bit Rate Display the bit rate of current video stream. User can select other bit rate. If iV3377WD/iV3377WTIR is rebooted, the bit rate on the monitoring page is initialized to the designated value of ―server setting page‖. Changing the bit rate is not available on a guest account. Enable Audio If the box is checked the iV3377WD/iV3377WTIR sends the audio data with the video data.
USER’S MANUAL ▲ SERVER SETTING To apply the changed setting, reboot iV3377WD/iV3377WTIR. (Click Reboot on the menu) Network Status This is the initial page of Server Setting. This shows network status, model information, network traffic status, connection list, and system log.
USER’S MANUAL Network Status MAC Address: Media Access Control Address of iV3377WD/iV3377WTIR; this is unchangeable. IP Address: the assigned IP Address of iV3377WD/iV3377WTIR Subnet Mask: where the Sub-network of the IP address belongs to. (Use the value to fit the network environment) Gateway: Gateway Address (Use the value to fit the network environment) Default DNS: IP Address of Default DNS server Connection List User can check the number of connected clients and IP addresses.
USER’S MANUAL Basic Configuration > Network User can set Network Information of iV3377WD/iV3377WTIR—IP Address, Subnet Mask, Gateway, and Default DNS ① Static IP IP Address: Ask network administrator for an appropriate address. Subnet Mask / Gateway / Default DNS: Ask network administrator. After setting, click [OK] button. Click [Reboot] to apply the setting to iV3377WD/iV3377WTIR.
USER’S MANUAL ② Dynamic IP If DHCP server is on the local network and you intend to allocate IP address dynamically, use this method. Select Dynamic IP tab; click [OK] button; and reboot iV3377WD/iV3377WTIR. If you want to select Dynamic IP, set Dynamic DNS to access iV3377WD/iV3377WTIR.
USER’S MANUAL ③ PPPoE Use in case the network supports PPPoE like xDSL. Ask ISP (Internet Service Provider) for details. User ID: xDSL User ID User Password: xDSL User Password Service Name: Service Name of ISP MTU: Maximum Transmission Unit of Data IP address of DNS sever can be set to create automatically. If your xDSL does not use static IP type, you should use Dynamic DNS setting like DHCP.
USER’S MANUAL Basic Configuration > Video User can select video streaming type (Encoder or Decoder Mode). iV3377WD/iV3377WTIR supports only an Encoder mode.
USER’S MANUAL Video Setting Preview: User can check the current video setting through the preview images. (First / Second / Third Stream Selectable) Video Compressed Type: H.264 / MJPEG (Compression Type of Third Stream: MPEG4) Resolution: QQVGA / QCIF / QVGA / CIF / VGA / 4CIF / D1 (Resolution of Third Stream: QCIF Fixed) Bit Rate Type : CBR / VBR • Constant Bit Rate : 8M / 7M / 6M / 5M / 4M / 2M / 1.
USER’S MANUAL • Basic Configuration > Audio Server to PC Audio Option Audio Type: Mono (Fixed) Audio Codec: G.711 / G.726 Sampling Rate: 8 kHz/ 32kHz Volume: -34.
USER’S MANUAL Basic Configuration > Event notification ① Digital Input iV3377WD / iV3377WTIR 35 / 60
USER’S MANUAL Common Sensor Type: Select a type out of two types Preset Preset Enable: Enables the iV3377WD/iV3377WTIR to send the preset signal to the connected camera which supports preset function Preset Number: Preset number that assigned to the camera which supports preset function Digital Output Digital Output Enable: Enables the iV3377WD/iV3377WTIR to send the digital signal to the connected device Digital Output Time: Adjusts the time for the iV3377WD/iV3377WTIR to send the signal (unit:
USER’S MANUAL ② Motion Detection Preset: Same as ―Digital Input‖ Setting Digital Output: Same as ―Digital Input‖ Setting FTP: Same as ―Digital Input‖ Setting SMTP (E-mail): Same as ―Digital Input‖ Setting iV3377WD / iV3377WTIR 37 / 60
USER’S MANUAL ③ Periodic Timer Common Periodic Timer Enable: Enables the iV3377WD/iV3377WTIR to send the signal to the client PC periodically.
USER’S MANUAL Basic Configuration > Date / Time ① Current Time Set Date / Time Server Time: Time that the iV3377WD/iV3377WTIR keeps internally New Date / Time: User can assign the specific time voluntarily iV3377WD / iV3377WTIR 39 / 60
USER’S MANUAL ② Time Server Time Server Enable: Enables time of iV3377WD/iV3377WTIR to synchronize with time server periodically Interval: Period (in seconds) Time Zone: User can select a time zone Daylight Saving Time: Check this box in using daylight saving time Time Server: User can assign a Time Server to apply the current time to iV3377WD/iV3377WTIR After setting, click the [OK] button and reboot Camera.
USER’S MANUAL Basic Configuration > Display Text Color Background Color: Select a color for the background Foreground Color: Select a color for the text Transparency: 0~10 iV3377WD / iV3377WTIR 41 / 60
USER’S MANUAL OSD Font Size: Normal / Big Date Enable: Display Date Time Enable: Display Time Channel Enable: Display Channel Name X Axis: Input a Point on the Coordinate Y Axis: Input a Point on the Coordinate Logo This is the image that is displayed on the transferred image.
USER’S MANUAL Advanced Option > Camera Setting Menu Access to the OSD menu of iV3377WD, iV3377WTIR Series Direction Keys Operate the OSD setting menu of iV3377WD, iV3377WTIR Series Set Select a value on the OSD setting menu of iV3377WD, iV3377WTIR Series ※ For detail setting values, refer to page 13.
USER’S MANUAL Advanced Option > PTZ / RS232 iV3377WD/iV3377WTIR does not support PTZ and RS232 function. Channel 1 Channel Name: Channel Name of OSD Camera Protocol Type Camera ID : The Rx address of the connected PTZ camera or receiver. Camera Baud Rate / Data Bits / Parity / Stop Bits : Select the value properly by the receiver type. RS232 Baud Rate / Data Bits / Parity / Stop Bits : Aelect the value properly by the receiver type.
USER’S MANUAL • Advanced Option > WEB Port Web Web Port: Default is 80 iV3377WD / iV3377WTIR 45 / 60
USER’S MANUAL • Advanced Option > Security level check Security Level HIGH : Only connections from the local area are permitted. MEDIUM : Video and Audio connections from any place and setting from the local area permitted.
USER’S MANUAL Advanced Option > User Account setting Account The password amendment of administrator account is available. The administrator can add up to 5 users and modify the properties. Guest Permission This is to determine the guest permission for access to the iV3377WD/iV3377WTIR. At guest account, video and audio monitoring is permitted.
USER’S MANUAL Advanced Option > DDNS DDNS is the function that matches an IP address and a host name. If an iV3377WD/iV3377WTIR has the dynamic IP address, the host name by DDNS (Dynamic Domain Name Service) must be used instead of the IP address for the credibility of the network connection. IPv4 DDNS Check the ―Enable‖ box and select a service out of two. Both are required to register some items on each service site. ► Using ―ddns.
USER’S MANUAL DynDNS For use of ―ddns.nu‖, register at www.dyndns.com. Type the registered DDNS ID, DDNS Password, Host Name, and Interval for updating and click [OK] button and reboot the iV3377WD/iV3377WTIR.
USER’S MANUAL ddns.nu For use of ―ddns.nu‖, register at www.ddns.nu. Type the registered DDNS ID, DDNS Password, and DDNS Handle and click [OK] button. Reboot the iV3377WD/iV3377WTIR. ▶ Main page of ―ddns.nu‖ ProutDNS ProutDNS is a set of PHP scripts to create your own Dynamic DNS service. Type the DDNS server, the registered DDNS ID, DDNS Password, Host Name, and Interval for updating. Click [OK] button and reboot the iV3377WD/iV3377WTIR.
USER’S MANUAL Advanced Option > AUTO IP Broadcast Check Auto IP broadcast check Enable: Check the box to use UPnP (Universal Plug and Play) of iV3377WD/iV3377WTIR. Friendly name: User can change the friendly name of iV3377WD/iV3377WTIR.
USER’S MANUAL Advanced Option > Motion Detect Area Setting Input Setting Check ―Enable‖ box for use of motion detection. Detect Area: If the detection area is selected, the selected area turns green. (User can check preview image assuming JPEG Capture is enabled on the video setting page.) Sensitivity: 1~30 (Maximum sensitivity is ―1‖.
USER’S MANUAL Advanced Option > Firmware Upgrade iV3377WD / iV3377WTIR 53 / 60
USER’S MANUAL Language Language Select: Select a language file (After that, it is required to refresh the web browser. Please push F5 button.) Language File: Add a language file Firmware Upgrade Uploads the new firmware after clicking the browsing button and finding a new firmware. Logo Upload Changes the logo image file. The process is the same as ―Firmware Upgrade.‖ Use GIF file (Maximum size: 567x175) OSD Logo Upload Changes the logo image on OSD.
USER’S MANUAL Advanced Option > Generating configuration report Report User can check all of the settings for iV3377WD/iV3377WTIR. User or installer can memo on the report page. User or installer can print out the pages and use them for various usages Reboot To apply the changed settings, reboot iV3377WD/iV3377WTIR.
USER’S MANUAL CAMERA SPECIFICATION Model iV3377WD, iV3377WTIR Series Camera Type Color/BW Anti-Vandal 18IR-LED Day/Night Digital Dome Camera Mount Surface Device Super HAD II CCD Size 1/3‖ Pixels-Total 811 (H) x 508 (V) Pixels-Effective 768 (H) x 494 (V) System 525 Line, 2:1 Interlace Horizontal Frequency 15,734 Hz Vertical Internal Frequency Mode 59.
USER’S MANUAL NETWORK SPECIFICATION Model Video Streaming Audio Streaming External I/O Network Software Physical Power iV3377WD, iV3377WTIR Compression Type H.264 / MJPEG / MPEG-4 Resolutions D1 ~ QQVGA Bit Rate 32Kbps ~ 8Mbps Frame Rate 30/25fps (NTSC/PAL) in All Resolutions Streaming H.264 Dual Stream or Simultaneous H.264 and MJPEG Bi-Directional Audio Two-Way, Full Duplex Audio Input Compression G.711 / G.726 Audio Line Input 1Ch (Line Level Input) Audio Output Compression G.
USER’S MANUAL RECOMMENDED SPECIFICATION FOR EXTERNAL DEVICES Client PC Item Specification Network 10/100 Base-T LAN (Dedicated IP Line, xDSL, Cable Modem) Processor Pentium Dual Core or Above RAM 2GB or Above Graphic Card 512MB or Above OS Windows 2003 / XP / Vista / Windows 7 Monitor 1024 x 768 Pixels or Above iV3377WD / iV3377WTIR 58 / 60
USER’S MANUAL WARRANTY INFORMATION Digital Watchdog (referred to as ―the Warrantor‖) warrants the Digital Camera against defects in materials or workmanship as follows. LABOR: For the initial five (5) years and one (1) year on IR LED from the date of original purchase, if the Digital Camera is determined to be defective, the Warrantor will repair or replace the unit with new or refurbished product at its option at no charge.
USER’S MANUAL LIMITS AND EXCLUSIONS There are no express warranties except as listed above. The Warrantor will not be liable for incidental or consequential damages (including without limitation damage to recording media), resulting from the use of these products or arising out of any breach of the warranty. All express and implied warranties, including the warranties of merchantability and fitness for particular purpose, are limited to the applicable warranty period set forth above.