
Manual

CAMERA SETTINGS
CONNECTION
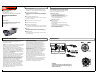
※ ATTENTION
1. Do not rotate ① more than 360˚.
2. Do not twist ② many times unnecessarily.
SETUP FUNTION SUMMARY
when using BUILT-IN lens,
the type of the lens is able to fix
MANUAL: 1/60(50) ~
1/120,000sec, x2~ x128
WHITE BAL. ATW, MANUAL, AWC
ATW: 1,800 ~10,500
˚
K
BACKLIGHT OFF, LOW, MIDDLE, HIGH Backlight compensation
AGC NORMAL, HIGH,OFF the Brightness can be adjusted(1 ~ 70)
when AGC is turned off,
DNR does not operate.
when AGC is turned off,
SENS-UP does not operate.
SPECIAL Refer to the bottom
Saved all the setting menu,
then exits.
uppercase or lowercase, OFF maximum length for the name
/numeral 0~9/-, null display is limited 15letters.
AUTO :
dayatime
→
color mode ,
night-time
→
B/W mode
B/W : Always B/W mode
COLOR: Always color mode
EXTERN
:
CDS
EXTERNAL
SIGNAL
INPUT
LL mode: you can adjust
desired phase from 0
˚
~ 359
˚
,
auto detection
MATION ON mode: AREA(4 programmable
DETECTION zone /SIZE), the word
MOTION DETECTED" appear on the
screen when movement is detected
ON mode:AREA(4 programmable
zone) /SIZE/TONE
MIRROR OFF, ON set a horizontal image inversion.
the available range
of level is 0 ~ 31.
returns to the level which was set
by the manufacturer for shipment.
save the SPECIAL MENU and then
PRIVACY OFF, ON
SHARPNESS OFF, ON(=8)
RESET
OFF, ON
RERURN
CAMER ID
DAY NIGHT AUTO, B/W, EXTERN, COLOR
SYNC INT, LL
SENS-UP AUTO(=X6), OFF
EXIT
SHUTTER ESC, MANUAL, FLK, OFF
DNR MIDDLE, HIGH, OFF, LOW
LENS
CAUTION :
Check for polarity when using a DC 12V / AC 24V.
CAMERA SETING ANGLE
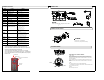
CAMERA SETTINGS
CONTROL BOARD
CONNECTION
※ ATTENTION
1. Do not rotate ① more than 360˚.
2. Do not twist ② many times unnecessarily.
SW2
SW3
SW1
CON2
SETUP FUNTION SUMMARY
when using BUILT-IN lens,
the type of the lens is able to fix
MANUAL: 1/60(50) ~
1/120,000sec, x2~ x128
WHITE BAL. ATW, MANUAL, AWC
ATW: 1,800 ~10,500
˚
K
BACKLIGHT OFF, LOW, MIDDLE, HIGH Backlight compensation
AGC NORMAL, HIGH,OFF the Brightness can be adjusted(1 ~ 70)
when AGC is turned off,
DNR does not operate.
when AGC is turned off,
SENS-UP does not operate.
SPECIAL Refer to the bottom
Saved all the setting menu,
then exits.
uppercase or lowercase, OFF maximum length for the name
/numeral 0~9/-, null display is limited 15letters.
AUTO :
dayatime
→
color mode ,
night-time
→
B/W mode
B/W : Always B/W mode
COLOR: Always color mode
EXTERN
:
CDS
EXTERNAL
SIGNAL
INPUT
LL mode: you can adjust
desired phase from 0
˚
~ 359
˚
,
auto detection
MATION ON mode: AREA(4 programmable
DETECTION zone /SIZE), the word
MOTION DETECTED" appear on the
screen when movement is detected
ON mode:AREA(4 programmable
zone) /SIZE/TONE
MIRROR OFF, ON set a horizontal image inversion.
the available range
of level is 0 ~ 31.
returns to the level which was set
by the manufacturer for shipment.
save the SPECIAL MENU and then
returns to the SETUP MENU
PRIVACY OFF, ON
SHARPNESS OFF, ON(=8)
RESET
OFF, ON
RERURN
CAMER ID
DAY NIGHT AUTO, B/W, EXTERN, COLOR
SYNC INT, LL
SENS-UP AUTO(=X6), OFF
EXIT
SHUTTER ESC, MANUAL, FLK, OFF
DNR MIDDLE, HIGH, OFF, LOW
LENS
KEYBUTTON
OSDBUTTON
ZoomFocusControlButtons
BUTTON
IDButtons
BUTTON
CAUTION :
Check for polarity when using a DC 12V / AC 24V.
CAMERA SETING ANGLE
FUNCTIONAL OF CONTROL BOARD
1. SW1 Joystick
The function of SW1 joystick are camera zoom in/out and OSD control.
a) Press SW3 button for 2 seconds until red LED light around the camera
lens flickers 3 times. And the function of SW1 is switched to control Omni
Focus Zoom ON/OFF.
b) Press SW3 button for 2 seconds until red LED light around the camera
lens flickers 3 times. And the function of SW1 is switched to control OSD
menu.
2. SW2
The camera ID number is set by pushing SW2 switches.
(※1,2,4,8(BCD code) means ID number, and ID contains 10 numbers from
0 to 9.) for the IR remote only
3. CON2
Video Test output connector
Omni‐Foc u sRemoteControlInstructions
1. ChecktheDipswitch(SW4)forcameraID(Defaultis0)
2. Pointtheremotecontroltowardsthecamera,thenpressand
hold[0]untiltheRedLEDlightstartflashing.
3. PressandholdtheKEYbutton,untilLEDturnsasolidRED.
4. PressthePlussign
(+)toZOOMIN,Minussign(‐)toZOOMOUT
5. Pressthe[ENT]buttontoenterthesetupMenuandpress[KEY]
buttontoexit.