
Specifications


QSL Labels printing
Printing QSL labels is possible from the Logbookby pressing the button of the toolbar.
Selecting the QSOs
The program prints the labels of all the QSOs of the current selection whose QSLS field is R
or Blank and QSL_Print field is not N. You can modify the current selection by using the
Select button (in that case, please avoid to select by QSLS) : i.e, you may select specific
QSOs using the QSL_Print field (QSL_Print=L).
The title bar of the wizard displays the number of QSLs to print which means the number of
QSOs whose QSL Sent field is R (Requested) or Blank and QSL_Print field is not N.
If QSL_Print=A, a label with the address will be printed.
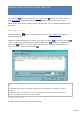
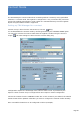
Setting
In view of the variety of available format, there is no defined label format. A graphic wizard
allows you to adjust the label size to match your paper/printer. Adjustment can be made to
margins, spaces between labels, size etc...
You may also indicate the number of the first label to print in order to use a previously started
sheet.
The font size will be adjusted so that the printed information matches the label size.
The QSL option allows you adding the QSL status ( PSE QSL or TNX QSL). The Message
check box allows you to add - or not - the message field from the Logbook. The QTH check
box allows you to add your QTH or any other text to your UserID. Please note that you can
set the QTH from the Preferences dialog box under Location. The Color check box allows
you to print the recipient callsign in red.
One or two trials may be necessary to set all the parameters.
Note
Adjustments are made from the printing zone of the printer. You have to adjust to the proper
margins of the printer.
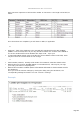
The Label
Printed information includes : the callsign, the QSL Manager (if available), your UserID
followed by your QTH (optional), QSL status (optional), date and time, frequency, mode,
report sent and the message (optional).
How to personalize the message
Page 284