
Specifications


<body onload="window.scrollTo(0, 1)"> hides the URL bar on the Safari browser.
<meta name="viewport" content="width=300px"> forces the zoom for a width of
300 pixels (to be adjusted to your smartphone)
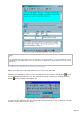
Setting up remote control
You may specify some limitations such as :
TX (authorization for TXing), Frequency Range (in MHz, for TXing), Maximum Power in
Watts,
Authorization for using the Rotor ,
Maximum AF volume for the receiver (0-255),
DX Spots relay, maximum number of Spots and display of the DXCC Award status (by
colors) (*),
Predefined CW messages and Macros ; however, these parameters may be edited
dynamically from the Web Interface
Logbook : allows quick logging of the current Spot (QSO must be edited for additional
information such as DXCC country...).
(*) Note : in all cases, Spots relayed by the WebServer are those received from the
Telnet/Packetor WebCluster TRX-Manager’s interface (if active) using the filters defined under
the Preferences of the Terminal or of the WebCluster.
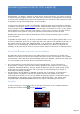
Using the Web Interface
From the Server computer (which controls the station), please launch TRX-Manager and the
Monitoring. If needed launch the WebCluster or connect a Telnet Cluster to relay spots.
Activate the Web Server (Transceiver/Web Server submenu) using the OPEN button.
From the remote computer or device, please launch its Internet browser and connect to
TRX-Manager by typing in the Server’s address in the URL field of the browser ; click the GO
button of the brower. If you connect from a local network, you use a local address such as
http://192….. If you connect from the Internet, you must use the Internet IP of the router.
If the defined port is not 80, you must specify the port by adding the suffix :nn(nn= port)to
the web address (i.e < /FONT> http://192.168.1.100:8500 if 8500 is the specified port).
If a Password is requested, a welcome page displays. Type in the Password and click Enter.
If the Password is valid, the Web Interface is displayed.
Page 212