
Specifications


Typical setup for SERVER and CLIENT using UDP protocol
Summary of the main steps
1.
Configure TRX-Manager from the base station (SERVER) as if remote control is not used
(remote control NOT enabled) and make sure all is working perfectly (locally: you must be
physically present)
2.
Install TRX-manager on the remote computer (CLIENT) and configure both instances of
TRX-Manager (CLIENT and SERVER) for the standard mode of control as described in THIS
section of the help
3.
Please keep the defaults settings for your first tests with NO password or Watchdog.
4.
Make sure all is working and you are able to control remotely all elements of the station (with,
of course, some limitations inherent to the remote control mode)
5.
Eventually, consider configuring TRX-Manager for the real-mode .
Please DO NOT SKIP none of these major steps and follow each step carefully.
STARTING THE REMOTE CONTROL
Once both station are configured, you engage Remote Control mode from SERVER and from
CLIENT .
It is recommended you disable any screen saver or sleep mode on the SERVER computer. You
may also use the STOP SAVER option of the TRX-Manager's Preference software tab.
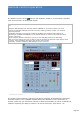
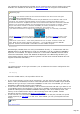
TCP and UDP
From Client, you click the Connect button : remote control is established and the status
of the remote transceiver is displayed under the remote control tab. As soon as you click the
OP button of the Remote control window, the remote transceiver becomes the Operating
transceiver and the CW Keyboard, the Rotor, the Logbook, the DX Bar window, the SW
Database are linked to the Remote transceiver.
Some critical messages sent by SERVER are displayed in the small terminal and sending
Page 191