
Specifications


Buttons
The buttons have the following functions:
button 1 (trigger): this button stops the scanning immediately
buttons 2 & 6: centers the action of the joystick without opening the Preferences (both
buttons have the same effect : button 6 is preferable since it is located on the base of
the Joystick but button 2 may be more easily wired).
button 3: scanning speed is divided by 10
button 4: scanning speed is multiplied by 10
Problems and resolution
1) You note a frequency shift without any action on the Joystick:
the joystick is not properly centered : press the button 6 (or the Center button of the
Preferences/Joystick)
backlash is too low : increase the backlash
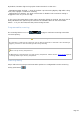
2) You don't know the buttons number:
open the Preferences/Joystick and press any button of the Joystick: its action will be
displayed in the Buttons frame.
3) Your Joystick is a force feedback device
In that case you must use a driver or a program (not included) which forces the joystick to be
centered. It is possible that only R-Axis may be usable...
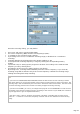
4) You don't understand how to set the joystick
Please start from beginning by clicking the Default button of the Preferences/Joystick tab.
Then activate the XY-Axis and press the button 6 of your joystick: your joystick is now ready
to use. Calibrating is especially required if you don't have any driver for your joystick (for
home made devices).
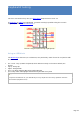
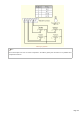
How to build a Joystick
Joysticks are generally cumbersome. Wiring a joystick for a sound card is not difficult (*): the
wiring diagram is provided for your enjoyment but without any support of any kind.
Page 117