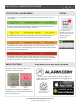
USER MANUAL ABOUT THIS DOCUMENT CERTIFICATION This document describes the user interface and controls for the DSC Touch, a “Smart home” control and automation system. Within these pages you will find how to enable and simplify home security, home control, energy management, home healthcare, and other services.
DSC TOUCH - INTRODUCTION CONGRATULATIONS! We’d like to thank you for making the decision to purchase the DSC Touch. We hope you’ll enjoy using it as much as we enjoyed developing it. It’s got everything you need in a single, easy to use device, and because we developed the software using an upgradeable operating system, we can continue to refine your experience over time with software updates and innovative new devices.
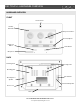
DSC TOUCH - HARDWARE OVERVIEW HARDWARE OVERVIEW FRONT Panel Camera Header/ Status Bar Primary User Interface Footer/Help bar Emergency Button Home Button Microphone BACK Mounting holes Cooling Vents Mounting plate SD Card Slot Two-Way Voice Speaker Panel Sounds Speaker Rear access Siren DSC CONFIDENTIAL AND PROPRIETARY PAGE 3 OF 34 © Last updated 2/18/15 All rights reserved
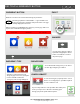
DSC TOUCH - HOME SCREEN OVERVIEW HOME SCREEN FIND IT The home page is the primary page shown on the DSC Touch. It is the first page the user will see, and it is the default page when the user pushes the home button on the panel. It is divided into three sections: The header/status bar, the primary user interface, and the footer/help bar. The home page displays the most important and most frequently used Apps.
DSC TOUCH - HEADER/STATUS BAR STATUS TYPES & COLOR CODES STATUS The header bar is color coded based on system status, and shows the date, time, and current status. The green header is labeled “System Ready – Disarmed” and indicates that all of the sensors are closed and the system is ready to be armed. The yellow header is labeled “System Not Ready – Disarmed” and indicates that one or more of the sensors are open. Touch this yellow bar to see a list of open sensors.
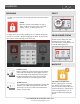
DSC TOUCH- EMERGENCY BUTTON EMERGENCY BUTTON FIND IT Below the 7” Touchscreen are two buttons: Emergency and Home. + The Emergency Button is marked with a “+” sign. This button can be pressed at any time, regardless of the panel’s status or the page currently displayed on the screen. When pressed, the panel will display the emergency services page, with access to police, fire, and medical emergency alarms.
ALARM EVENTS ALARM EVENTS When the alarm is triggered the DSC Touch will sound the siren and display a red alarm screen. If your security provider offers monitoring service, the panel will automatically contact the monitoring center using the built in cellular connection. To disarm, touch the screen and enter your passcode.
EMERGENCY PANIC EMERGENCY PANIC When you press the Emergency Button the Emergency Panic screen appears. Touching any of the buttons will trigger an alarm manually. POLICE An “Intrusion” alarm is triggered when you touch the “Police” panic button. (touching “silent” triggers a silent alarm.) For your security, once a police siren has been triggered it cannot be silenced without a passcode. The alarm will sound until you touch cancel. A “Fire” alarm is triggered when you touch the “Fire” panic button.
ARMING ARMING FIND IT The first icon on the home screen is used for arming and disarming. PRESS TO ARM The green “unlocked” icons means your system is currently disarmed and ready to arm and will coincide with a “System Ready” message in the Header/Status Bar. Touching this icon will provide you with two arming modes and several optional ARMING OPTIONS EXIT SOUNDS The panel beeps as the arming timer counts down. You can silence these beeps before you choose an arming type.
DISARMING DISARMING FIND IT The first icon on the home screen changes appearance when the system is armed. ARMED When the system is armed, whether in “Stay” or “Away” mode, the icon turns red (or orange) and appears “locked.” To disarm, tap this icon. If a “delay” door is opened the panel will go into a countdown, allowing the user time to enter their code without triggering the alarm. The camera will take a picture and save the image in the camera app.
WEATHER WEATHER FIND IT The second icon on the home screen is for weather 78 45 TODAY’S FORECAST Today’s forecast is displayed on the weather icon with a graphical representation of expected precipitation, as well as the High and Low temperatures for the day. PRECIPITATION The forecasted precipitation will be depicted visually on the panel, and will change based on the day’s outlook.
CAMERA CAMERA FIND IT The third icon on the home screen is Camera app. CAMERA APP The Camera app is used to access the images taken by your built in panel camera and up to 5 Image Sensors. CODE REQUIRED? PROTECT YOUR IMAGES You can protect the images taken by your cameras in one of two ways: 1- Require code to access the app. This will require anyone trying to access the entire app to enter a valid user code.
STATUS STATUS FIND IT The first icon on the second row is Status. STATUS APP The Status app is divided into four sections: Current Status, Alerts, Alarms and History. ALERTS If the DSC Touch is reporting a new issue, it will display a bubble above the app showing the number of new items that may require your attention. CURRENT STATUS The individual security sensors are listed by zone/area. The status and settings for each of the sensors are shown in a list.
HOME CONTROL HOME CONTROL FIND IT The house icon on the second row is Home Control. HOME CONTROL Control all your home automation devices from one place.
APPS APPLICATIONS FIND IT The folder icon on the second row is labeled Apps. APPS Since the DSC Touch is built on the Android operating system, you have access to a variety of useful applications, and more to come as they are developed. CLEAN SCREEN Pressing this will completely deactivate the touchscreen for 30 seconds, giving you time to clean it off. Press the home button to deactivate.
SAFETY SENSORS SAFETY SENSORS FIND IT Safety Sensors are created when the system is installed, and can be accessed from the Apps page. SAFTEY SENSORS A way to protect specific areas of your home without triggering false alarms. ARMED ALARM If a safety sensor is tripped while the panel is armed, it will not sound the alarm and the alarm will remain in it’s current state. QUICK ACCESS Safety sensors function independently from the intrusion security system on the DSC Touch.
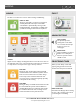
PHOTO FRAME PHOTO FRAME FIND IT Press “Apps” and then select “Photo Frame.” PHOTO FRAME Turn your DSC Touch into a digital photo frame. Navigate. View pre loaded images or add some of your own! When you open the Photo Frame app, you will see thumbnails of the images saved in the panel, as well as buttons to play, remove and add photos as well as a settings button. PREVIEW To preview a photo, touch the picture from the photo frame app. It will expand to full screen.
PHOTO FRAME ADDING PHOTOS FIND IT 1 Insert an SD Card* into your computer *We recommend using a “class 2 Open the SD Card folder and create a new folder called “Photos” 3 Located the new pictures you want to use, making careful note of the requirements on the right. 4 Copy your pictures into the “Photos” folder on the SD Card. 5 Safely eject the SD Card from your computer.
SOUND SETTINGS SOUND SETTINGS FIND IT Choose to customize your panel’s sounds. SOUND Navigate to the “Sound” icon through the “Apps”folder or through your panel’s “System Settings” to manage and customize your panel’s volume, chimes, etc. SPEAKER Panel sounds come from the left speaker just behind the screen. Dedicated panel sounds speaker Voice Settings: Enable or disable the panel from speaking sensor names, panel status etc.
LANGUAGES CHANGING LANGUAGE FIND IT ENGLISH, FRENCH OR SPANISH Your panel can easily switch from English to French or Spanish to accommodate your language of choice. Note: This toggle changes the words on the screen and the spoken words, but will NOT change your sensor 1 Touch “Apps” 2 Touch the “Globe” icon to toggle between English, French or Spanish. Hold the icon to set favorites.
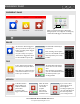
SETTINGS SETTINGS FIND IT The first icon in the footer/help section is “Settings.” SETTINGS Inside settings you’ll access a variety of options to customize the panel’s interface and abilities to your location and situation. A valid master code is required to access this part of the system. Users have the ability to adjust various settings to customize their experience. To access this area you will need to enter your master code.
SYSTEM SETTINGS SYSTEM SETTINGS FIND IT From the home page, press “Settings” and then “System Settings.” SYSTEM SETTINGS Access basic system settings like Wi-Fi, sound, and display settings. Wireless Settings View your current network or connect to new ones Sound Adjust the sound settings for your panel Brightness Change the panel’s brightness SD Card See whether the panel detects an SD Card, and safely “eject” that SD Card when you are done using it.
WIRELESS SETTINGS CONNECTING WI-FI FIND IT CONNECTING WI-FI Connecting to a local Wi-Fi network will allow a wide variety of features and benefits. To connect your panel to Wi-Fi, follow the steps below: 1 Press “Settings” Enter your master code 2 3 Select “System Settings” 4 Select “Wireless Settings” 5 Select “Wi-Fi Settings” 6 Choose your network from the list.
USERS USERS FIND IT Access “User Management” through the “Settings” icon. USERS Add, delete, or edit names, access levels and individual user codes for those who access your system. You can add up to 242 users, so make sure everyone who should have access has their own code! AUTO-UPDATE When you make a change to a user, it will automatically update the information on your Alarm.com account. The DSC Touch allows multiple users to control the system.
SYSTEM TESTS SYSTEM TESTS FIND IT Press “Settings” and select “System Tests” SYSTEM TESTS Testing your panel’s various communication paths are essential in the upkeep of your alarm. The panel provides a variety of different tests you can use to make sure everything is communicating accurately and effectively. TEST WEEKLY Test your system regularly (we suggest on a weekly basis). Ask your security provider for details.
EDIT SENSOR EDIT SENSOR FIND IT Edit the name and behavior of a sensor in the system. EDIT SENSOR Edit a sensor name and chime with which it’s associated. Navigate to “Settings” then “Edit Sensors” CUSTOM TEXT TO SPEECH Edit a sensor by using our list from the drop down or customize your own. Choose a chime that suits it’s location and whether or not yo’d like the panel to announce the sensor name by toggling voice prompts.
PANEL REBOOT PANEL REBOOT FIND IT PANEL REBOOT Sometimes technology needs a swift kick. Simply reboot your panel to keep it in line!. 1 2 Touch “Settings” Enter your master code 3 Touch “Panel Reboot” 4 Touch “OK” when the panel reboot pop up appears. Allow up to 5 mins for your panel to come back online.
HELP HELP FIND IT The second icon in the footer is “Help” HELP APP The “Help” app is divided into three sections: Video tutorials, FAQs, and Contact Us VIDEO TUTORIALS To watch a video, select the Video Tutorials tab and press “Play” The built in library of video tutorials includes video instructions on common questions like “User Codes” and “Connecting Wi-Fi” FAQs The panel also has a tab with frequently asked questions that allow a user to find an answer the most common questions.
CONTACT US CONTACT US FIND IT Select the “Contact Us” icon in the bottom right corner. CONTACT US Touching the “Contact Us” icon on the bottom right of your screen allows you to view your security provider’s contact information. (NOTE: the information shown here is for demonstration purposes only. Please refer to your own panel for your provider’s information) NOTE: In some cases, the “phone” icon shown here may be replaced with your security and home control provider’s logo.
LEGAL LEGAL This document is subject to change without notice. Tyco Safety Products Canada, Ltd. (“DSC”) assumes no responsibility for errors or omissions and disclaims any liabilities and losses experienced as a result of using this document. For the most recent documentation, contact your local vendor. This document may contain images or information used in normal operations of the DSC Touch (the “Product”). These may include fictitious names of people and companies.
LEGAL LEGAL (Cont.) stoves, barbeques, fireplaces, sunlight, steam vents, lighting and so on. • Warning Devices Warning devices such as sirens, bells, horns, or strobes may not warn people or waken someone sleeping if there is an intervening wall or door. If warning devices are located on a different level of the residence or premise, then it is less likely that the occupants will be alerted or awakened.
LEGAL LEGAL (Cont.) Di s claim er of Warranties This warranty contains the entire warranty and shall be in lieu of any and all other warranties, whether expressed or implied (including all implied warranties of merchantability or fitness for a particular purpose) And of all other obligations or liabilities on the part of Digital Security Controls.
LEGAL LEGAL (Cont.) G.BATTERY INFORMATION & WARNINGS Main AC-DC Supply Converter Voltage Input 100-240V (AC-DC converter) frequency, 50/60hz max. input current 0.68A Max Voltage output 12V, 2A Panel Battery Battery Type Lithium Ion Polymer battery Lifetime Power Cycles 300+ Power Cycles ( fully charged to fully discharged state ) DC voltage 8.4V max battery model number Springpower 704077 max.
LEGAL LEGAL (Cont.) Cause of FAR: Erroneous user fire, medical or police panic alarm generated. Prevention: Do not press the Emergency button unless there is a real emergency. If the emergency alarm is accidentally activated, then quickly enter the disarm pass code which will then cancel the alarm. I. Insert warnings from DSC Warnings terms This equipment has been tested and found to comply with the limits for a Class B digital device, pursuant to part 15 of the FCC Rules.