
User's Manual

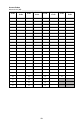

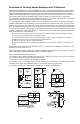


Table Of Contents
- WTK5504 v1.0 Touchscreen
- User Manual
- Home Screen
- Arming and Disarming the System
- 1. Close all sensors (i.e., stop motion and close doors). The Ready () indicator should be on.
- 2. Press the Stay Arm button (and enter your Access Code) and do not leave the premises.
- • A numeric keypad is displayed. Tap your access code.
- • The Arming sequence is aborted and the system returns to the Home screen.
- • The Armed LED turns OFF.
- • The Home screen is displayed, indicating that the system is armed
- • The Ready Indicator turns OFF.
- • “Away Armed” is displayed in the Status Bar.
- Zone Status
- Bypassed Zones
- Emergency Key
- Indicators
- More Screen
- More Functions Screens
- Arming Modes
- System Chime (Chime Enable/Disable)
- Quick Exit
- Outputs
- User Options
- Access Codes
- 1. The default attributes of a new code will be the attributes of the code used to enter User Programming whether it is a new code or an existing code being programmed.
- 2. System Master Code 40 has attributes 3-4 ON by default.
- 1. Select “Set Access Code”. A keypad screen is shown with the existing code. If there is no existing code, “AAAA” (or AAAAAA for 6 digits) is shown.
- 2. Start to enter a new code. The code area will be cleared, and the new code will be shown. If the clear key is pressed, the new code will be cleared, but the old code is not deleted by this action. Once the last digit is entered the new code will h...
- 1. Press the Access Code Programming button, then “Set Access Code”.
- 2. Enter your desired 4- or 6-digit user access code.
- 3. Press Prox Tag Programming.
- 4. Place the prox tag near the tag reader at the top of the keypad to assign it to the user code. The message “Tag Enrolled Successfully” will be displayed and the keypad will beep. If the proximity tag has been enrolled previously, an error tone...
- 1. Press More > User Options > Access Code Prog. [Master Code].
- 2. Use left and right arrow buttons to select the user number associated with the proximity tag to be deleted and press Select.
- 3. Press Delete User and confirm by pressing Yes.
- 1. Press More > User Options > Access Code Prog. [Master Code].
- 2. Use left and right arrow buttons to select the user number associated with the proximity tag and press Select.
- 3. Choose “Replace Prox Tag” from the menu options.
- 4. Place the prox tag near the tag reader at the top of the keypad. The message “Tag Enrolled Successfully” will be displayed and the keypad will beep.
- Keypad Configuration
- 1. Use the slide bar to select the desired brightness of the night light backlighting.
- 2. To exit press the Back or Home button.
- 1. A button toggles verbal options on and off. When Verbal Chime is set to on, the WTK5504 will speak the zone label words (e.g., ‘Laundry Room Window’) when the zone chimes. When Verbal Prompt is set to on, the WTK5504 will speak system prompts ...
- 2. To exit press the Back or Home button.
- 1. Select the desired language.
- 2. To exit press the Back or Home button.
- • Time and Date
- • System Test
- • Late to Open Programming
- • Late to Open - On/Off
- • Auto-Arm Programming
- • Auto-Arm On/Off
- • Enable DLS
- • User Call-Up
- • User Walk Test
- Time & Date Programming
- System Test
- 1. After pressing System Test, the keypad and system buzzer will sound an error tone for 2 seconds. After the buzzer stops sounding, the keypad will say “Test” at full volume, regardless of whether verbal chime or prompting are enabled and regard...
- 2. To exit the function menu, press the Back button.
- 1. Prior to testing, ensure that the system is disarmed and the Ready light is on.
- 2. Close all zones to return the system to the Ready state.
- 3. Perform a System Test by following the steps in the “Testing Your Keypad Sounder and Siren” section.
- 4. Press More > User Options [Master Code] > User Functions > User Walk Test. To test the zones, activate each detector in turn (e.g., open each door/window or walk in motion detector areas).
- Late-to-Open Programming
- Late-to-Open On/Off
- Auto-Arm Programming
- Auto-Arm On/Off
- Enable DLS/Allow System Service
- User Call-Up
- Troubles
- Alarms
- When Alarm Sounds
- Fire Alarm Pulsed Siren
- Wireless Carbon Monoxide Alarm
- Intrusion (Burglary) Alarm Continuous Siren
- 1. If the alarm was accidental, enter your access code to silence the alarm. If the alarm system is disarmed within the programmed Abort window (check with the installer if this option has been enabled on your system and what transmitter delay time i...
- 2. Following the Abort window is a 5-minute Cancel window, during which a user can enter their access code to cancel a previously transmitted alarm. A cancel signal will be transmitted to the Central Station and the screen will indicate “Communicat...
- Sensor Reset
- Reference Sheets
- System Information
- Sensor / Zone Information
- Household Fire Safety Audit
- Fire Escape Planning
- IMPORTANT SAFETY INSTRUCTIONS
- • Do not spill any type of liquid on the equipment.
- • Do not attempt to service this product yourself. Opening or removing the cover may expose you to dangerous voltage or other risk. Refer servicing to qualified service personnel. Never open the device yourself.
- • Do not touch the equipment and its connected cables during an electrical storm; there may be a risk of electric shock.
- • Do not use the Alarm System to report a gas leak if the system is near a leak.
- • Do not subject the touchscreen to mechanical shock (e.g., dropping or striking). Mechanical shock could damage the glass display.
- • If the touchscreen glass is damaged, the liquid crystal fluid inside could leak out. Avoid contact with the liquid crystal fluid. If the liquid crystal fluid comes into contact with your skin or clothes, promptly wash it off using soap and water.
- • Do not apply excessive force to the display surface or adjoining areas. Excessive force will distort the image on the display.
- • Do not use hard or sharp implements to operate the touchscreen. Operating the touchscreen with any implement harder than a finger could scratch the display.
- • Do not attempt to disassemble the LCD Module.
- • If the display surface is contaminated, breathe on the surface and gently wipe it with a soft, dry cloth. If still not completely clean, moisten cloth with isopropyl alcohol.
- • Clean the touchscreen with a soft cloth and isopropyl alcohol. Use of other cleaners such as water, ketone (e.g., acetone), and/or aromatic solvents (e.g., benzene and toluene) may damage the display. Do not use abrasives, water, thinners, solven...
- About Your Security System
- • Use the system test described in “Testing Your System” to check the battery condition. We recommend, however, that the standby batteries be replaced every 3-5 years.
- • For other system devices such as smoke detectors, passive infrared, ultrasonic or microwave motion detectors or glassbreak detectors, consult the manufacturer’s literature for testing and maintenance instructions.
- IMPORTANT NOTICE
- Introduction
- • Display 4.3" WVGA (800 ´ 480 pixel) color resistive touchscreen
- • LED indicators 4 (Ready, Armed, Trouble, AC)
- • “Night” light with adjustable brightness
- • Dimensions (mounting) 5.5" x 3.6" x 1.0" [139.7 mm (L) x 91.4 mm (W) x 25.4 mm (D)]
- • Horizontal viewing angle 130° (typ.)
- • Vertical viewing angle 70° (top), 70° (bottom) (typ.)
- • Brightness 400 cd/m2
- • Operating environment 0°C to 49°C (32°F to 120°F)
- • Operating frequency 433.92 MHz
- • 93% (max.) relative humidity non-condensing
- • Display language(s) English, French, Spanish

22
Carbon Monoxide Detectors
GROUN D
FLOOR
BASEMENT
KITC HEN
GARAG E
BEDROOM
BEDROOM
BEDROOM
CARBON MONOXIDE DETEC TOR
Figure 5
Carbon monoxide is colorless, odorless, tasteless, and very toxic.
It also moves freely in the air. CO detectors can measure the con-
centration and sound a loud alarm before a potentially harmful
level is reached. The human body is most vulnerable to the effects
of CO gas during sleeping hours; therefore, CO detectors should
be located in or as near as possible to sleeping areas of the home.
For maximum protection, a CO alarm should be located outside
primary sleeping areas or on each level of your home. Figure 5
indicates the suggested locations in the home. o NOT place the
CO alarm in the following areas:
• Where the temperature may drop below -10ºC or exceed 40ºC
• Near paint thinner fumes
• Within 5 feet (1.5m) of open flame appliances such as fur-
naces, stoves and fireplaces
• In exhaust streams from gas engines, vents, flues or chimneys
• Do not place in close proximity to an automobile exhaust pipe; this will damage the detector
PLEASE REFER TO THE CO DETECTOR INSTALLATION AND OPERATING INSTRUCTION
SHEET FOR SAFETY INSTRUCTIONS AND EMERGENCY INFORMATION.
Household Fire Safety Audit
Read this section carefully for important information about fire safety.
Most fires occur in the home. To minimize this danger, we recommend that a household fire safety audit
be conducted and a fire escape plan be developed.
1. Are all electrical appliances and outlets in a safe condition? Check for frayed cords, overloaded
lighting circuits, etc. If you are uncertain about the condition of your electrical appliances or house-
hold service, have a professional evaluate these units.
2. Are all flammable liquids stored safely in closed containers in a well-ventilated cool area? Cleaning
with flammable liquids should be avoided.
3. Are fire-hazardous materials (e.g., matches) well out of reach of children?
4. Are furnaces and wood-burning appliances properly installed, clean and in good working order?
Have a professional evaluate these appliances.
Fire Escape Planning
There is often very little time between the detection of a fire and the time it becomes deadly. It is thus
very important that a family escape plan be developed and rehearsed.
1. Every family member should participate in developing the escape plan.
2. Study the possible escape routes from each location within the house. Since many fires occur at
night, special attention should be given to the escape routes from sleeping quarters.
3. Escape from a bedroom must be possible without opening the interior door.
Consider the following when making your escape plans:
• Make sure that all border doors and windows are easily opened. Ensure that they are not painted
shut, and that their locking mechanisms operate smoothly.
• If opening or using the exit is too difficult for children, the elderly or handicapped, plans for rescue
should be developed. This includes making sure that those who are to perform the rescue can
promptly hear the fire warning signal.
• If the exit is above the ground level, an approved fire ladder or rope should be provided as well as
training in its use.
• Exits on the ground level should be kept clear. Be sure to remove snow from exterior patio doors in
winter; outdoor furniture or equipment should not block exits.
• Each person should know the predetermined assembly point where everyone can be accounted for
(e.g., across the street or at a neighbour
’s house). Once everyone is out of the building, call the fire
department.
• A good plan emphasizes quick escape. Do not investigate or attempt to fight the fire, and do not
gather belongings as this can waste valuable time. Once outside, do not re-enter the house.
Wait for
the fire department.
• Write the fire escape plan down and rehearse it frequently so that should an emergency arise, every-
one will know what to do. Revise the plan as conditions change, such as the number of people in the
home, or if there are changes to the building’
s construction.
• Make sure your fire warning system is operational by conducting weekly tests. If you are unsure
about system operation, contact your installer.
W
e recommend that you contact your local fire department and request further information on fire
safety and escape planning. If available, have your local fire prevention officer conduct an in-house fire
safety inspection.