4 Securing the Premises To Load a Bypass Group (Continued) What you see 6. The group of zones are now bypassed. The following message briefly displays. Bypass Group Zones Bypassed then Press (*) for <> Bypass Group 7. To exit bypassing mode and return to the Ready state, press # .
5 Emergency Keys and Alarms 5.1 Emergency Keys IMPORTANT: EMERGENCY USE ONLY! Pressing both the emergency keys generates a Fire, Medical, or Panic Alarm, and alerts the monitoring station. e.g., to generate a panic alarm press both of the panic alarm keys for 2 seconds. The keypad beeps to indicate that the alarm input has been accepted and sent to the monitoring station. Fire Alarm Panic Alarm Medical Alarm NOTES: Verify with your alarm company that your system is equipped with emergency keys.
5 Emergency Keys and Alarms 5.3 Carbon Monoxide Alarm - 4 beeps, long pause, 4 beeps WARNING: Carefully review your Carbon Monoxide Alarm Installation/User Guide to determine the necessary actions required to ensure your safety and ensure that the equipment is operating correctly. Incorporate the steps outlined in the guide into your evacuation plan. Activation of your CO alarm indicates the presence of carbon monoxide (CO), which can be fatal.
6 Wireless Keys and other Devices In addition to the keypad, the HS Series system can be controlled using a variety of devices: • 2-way wireless keys • Proximity Tags • via SMS using a cellphone. 6.1 Using the 2-way Wireless Key 2-way wireless keys allow users in the close proximity of their house the ability to readily arm/disarm their system, and to call for help. For information on enrolling wireless keys see 7.1.3 "Enrolling Wireless Keys".
6 Wireless Keys and other Devices 6.3.1 Using the Keypad to Lookup the Number to Call for SMS Commands The phone number of the system is programmed by the installer. To quickly find the phone number perform the following steps. To find the System’s Phone Number 1. Check that the Ready * 2. Press What you see indicator is on and the system is disarmed. Date JAN 02/13 Time 2:06a Press (*) for <> User Functions 6 OR to navigate to User Functions and * and use the scroll keys * .
Wireless Keys and other Devices Table 6-1 SMS Commands (Continued) Notes Activates Output 2. Activate Command Output 3 Activates Output 3. Activate Command Output 4 Activates Output 4. Deactivate Command Output 1 Deactivates Output 1. Deactivate Command Output 2 Deactivates Output 2. Deactivate Command Output 3 Deactivates Output 3. Deactivate Command Output 4 Deactivates Output 4. Bypass 001 Bypasses specified zone number. Unbypass 001 Clears the bypass from the specified zone number.
Managing Users 7.1 User Codes Up to 95 different users can be programmed in the HS Series. Each user can be: • Uniquely labeled. • Assigned an access code. • Assigned a proximity tag and/or wireless key (key fob). In order to operate, proximity tags and wireless keys must be enrolled in the system. • Assigned to only operate specific partitions. For more information on partitions see section 10 "Managing Partitions". • Configured with additional attributes. For more information see 7.
7 Managing Users 7.1.1 Access Codes Each configured user is assigned a number from 01-95. When creating access codes the following criteria applies: • Codes cannot be duplicated. • New codes must differ from existing codes by more than one digit (e.g., if 1234 exists, 1235 is invalid). To Add or Change User Access Codes What you see 1. From the User Codes menu scroll to the label or enter the number of the desired user (01-95) and press * . 2. Press * or 1 Press (*) for <> Access Code . 3.
7 Managing Users To Delete a Proximity Tag What you see 1. From the User Codes menu press press * . 2 or scroll to Prox Tag and 2. If a tag is enrolled for this user you will be asked if you would like to delete the Tag. Press * to delete the tag. Press (*) for <> Prox Tag * To Delete Tag Press # to Exit Tag Deleted Successfully 7.1.3 Enrolling Wireless Keys When enrolling or deleting wireless keys the system provides a choice of option depending on if key is enrolled or not.
7 Managing Users To Edit a User Label (Continued) 2. Use the arrow keys character. What you see Program Name {User 1 Label} to move the cursor to a blank space or existing 3. Press the number key corresponding to the appropriate letter as shown in Figure 7-1. 4. When the required letter or number is displayed use the arrow keys scroll to the next letter. 5. When finished, press the then press * . * key, use the to keys to scroll to Save 7.1.
7 Managing Users To Configure additional User Options What you see 2. Use the keys to cycle through the User Options and press toggle configuring the displayed option. * to (*) To Toggle <> Bell Squawk Y 7.3 Maintenance Code A Maintenance code is a system user code that can only arm and disarm the system. There are no restrictions on the number of times that a Maintenance code can be used successfully.
8 Configuring User Functions 8.1 Selecting your language The HS Series supports multiple languages. To choose your language 1. Press What you see Language English together for 2 seconds. 2. Scroll though the options to your desired language. To confirm your selection press * or # . <> 2400364 V1.13 ENG L50 8.2 Turning the Chime ON/OFF Turning the chime on audibly notifies you whenever an entry/exit sensor is tripped. To turn the Chime ON or OFF 1.
8 Configuring User Functions 8.3.1 Event Buffer The Event Buffer displays a list of the last 1000 events on your system. You may only view the event buffer using an LCD keypad. To view the Event Buffer What you see 1. From the User Function menu scroll to Event Buffer and press 2. Press to scroll through the Event Buffer. When finished press to return to the Ready state. * . Select Option <> Event Buffer # 000X-Message Time/Date 8.3.
8 Configuring User Functions To set the Auto Arm time (Continued) What you see 4. Continue setting the time for the desired days of the week. When finished press # to return to the Ready state. Set 24Hr Time Enter HH:MM 9999 NOTE: If you set an invalid time the error tone will sound. 8.3.5 Allowing the installer to service your system remotely - DLS Occasionally, your installer may need to remotely access the Installer programming of your security system using Downloading Software (DLS).
8 Configuring User Functions To enable/disable Late to Open 2. Press * What you see Late to Open is Enabled to enable/disable the Late to Open feature. or 3. When finished press # Late to Open is Disabled to return to the Ready state. To set the Late to Open time What you see 1. From the User Function menu use the shortcut key to scroll to Late to Opn Time. 1 3 or press Press (*) for <> Late to Opn Time 2. Press * to open a days of the week sub menu.
9 Managing Troubles 9.1 Trouble Conditions For an explanation of possible trouble conditions and the recommended actions required see see Table 9-1. When the system detects a trouble condition the following occurs: • The Trouble indicator turns on. • The keypad beeps once every 10 seconds. Examining troubles is done using the • Press the • Press the • Press the * key. * key to silence the keypad beeps. * key to view trouble conditions. * key to acknowledge troubles.
9 Managing Troubles Table 9-1 Trouble Conditions (Continued) Trouble Condition Description Trouble Types Device Tampers The system has detected a tamper condition with one or more devices on the system. Call for service. • • • • RF Delinquency The system has detected wireless signal interference that is causing improper system operation. Call for service. • Zones Module Supervision The system has detected a supervisory trouble condition with one or more modules on the system. Call for service.
10 Managing Partitions A partition is a limited area of the premises which operates independently from the other areas. Partitioning a system can be beneficial if the property has outbuildings that need to be secured independently of a main area or if the home has a separate apartment. Each partition can have it's own keypad, or a keypad can have access to all partitions. User access to partitions is controlled via access code.
10 Managing Partitions • Keypad function keys can be programmed for Global Stay Arm, Global Away Arm and Global Disarm. • Multiple partition arming may be done from a global keypad assigned to the same partitions as the user. • System tests can be performed from the global keypad if all partitions are disarmed. 10.2.
10 Managing Partitions • A fire reset only resets partitions they are assigned to. • One or more fire keypads may be located on any partition. • On alarm, the fire auto-scroll display appears on all partition keypads and on all global keypads. Fire alarm silence and fire system reset may be done directly on any partition keypad. To silence a fire or CO alarm from a global keypad requires that the global keypad be loaned to one of the partitions.
11 Te s t i n g y o u r S y s t e m IMPORTANT • Test your system weekly. • Should your system fail to function properly contact your installation company immediately. • All smoke detectors must be tested by your smoke detector installer once a year to ensure proper operation. 11.1 System Test Tests all system keypad LED’s, keypad sounders, bells and/or sirens. To perform a Keypad and Siren Test 1. From the ready state press User Functions. * What you see 6 and enter the [Master code] to access 2.
12 Additional Features 12.1 Audio Verification Allows the monitoring station to initiate a 2-way audio (talk/listen) or 1-way audio (listen-in only) session when an alarm has been received. This feature is used to verify the nature of the alarm or determine the type of assistance required by the occupant. NOTE: Must be configured by installer. 12.2 Video Verification Allows the monitoring station to use video clips captured from system motion cameras for verification of any alarms.
13 Regulatory Agency Statements FCC COMPLIANCE STATEMENT CAUTION: Changes or modifications not expressly approved by Digital Security Controls could void your authority to use this equipment. This equipment has been tested and found to comply with the limits for a Class B digital device, pursuant to Part 15 of the FCC Rules. These limits are designed to provide reasonable protection against harmful interference in a residential installation.
13 Regulatory Agency Statements INDUSTRY CANADA STATEMENT NOTICE: This Equipment meets the applicable Industry Canada Terminal Equipment Technical Specifications. This is confirmed by the registration number. The abbreviation, IC, before the registration number signifies that registration was performed based on a Declaration of Conformity indicating that Industry Canada technical specifications were met.
14 Installer Warning WARNING Please Read Carefully positioned. Smoke may not be able to reach the smoke detectors, such as when the fire is in a chimney, walls or roofs, or on the other side of closed doors. Smoke detectors may not detect smoke from fires on another level of the residence or building. Every fire is different in the amount of smoke produced and the rate of burning. Smoke detectors cannot sense all types of fires equally well.
15 Safety Instructions To reduce the risk of fire, electric shock and/or injury, observe the following: • Do not spill any type of liquid on the equipment. • Do not attempt to service this product yourself. Opening or removing the cover may expose you to dangerous voltage or other risk. Refer servicing to qualified service personnel. Never open the device yourself. • Do not touch the equipment and its connected cables during an electrical storm; there may be a risk of electric shock.
16 EULA IMPORTANT - READ CAREFULLY: DSC Software purchased with or without Products and Components is copyrighted and is purchased under the following license terms: • • • • This End-User License Agreement (“EULA”) is a legal agreement between You (the company, individual or entity who acquired the Software and any related Hardware) and Digital Security Controls, a division of Tyco Safety Products Canada Ltd.
17 Locating Smoke and CO Detectors The following information is for general guidance only and it is recommended that local fire codes and regulations be consulted when locating and installing smoke and CO alarms. 17.1 Smoke Detectors Research has shown that all hostile fires in homes generate smoke to a greater or lesser extent. Experiments with typical fires in homes indicate that detectable quantities of smoke precede detectable levels of heat in most cases.
17 Locating Smoke and CO Detectors 17.2 Fire Escape Planning There is often very little time between the detection of a fire and the time it becomes deadly. It is thus very important that a family escape plan be developed and rehearsed. 1. Every family member should participate in developing the escape plan. 2. Study the possible escape routes from each location within the house. Since many fires occur at night, special attention should be given to the escape routes from sleeping quarters. 3.
18 Reference Fill out the following information for future reference and store this guide in a safe place. 18.1 System Information Mark if Buttons are Enabled o [F] FIRE o [M] Medical o [P] PANIC The Exit Delay Time is _______ seconds. The Entry Delay Time is _______ seconds. 18.
18 Reference 18.
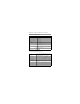
18 Reference Table 18-2 Sensor / Zone Information Sensor Protected Area Sensor Type Sensor 01 65 02 66 03 67 04 68 05 69 06 70 07 71 08 72 09 73 11 12 14 16 17 18 20 21 76 77 78 79 80 81 82 83 T 19 74 AF 15 Sensor Type 75 R 13 D 10 Protected Area 84 85 86 23 87 24 88 25 89 26 90 27 91 28 92 29 93 30 94 31 95 32 96 33 97 47 3 22
18 Reference Table 18-2 Sensor / Zone Information Sensor Protected Area Sensor Type Sensor 34 99 36 100 37 101 38 102 39 103 40 104 41 105 42 106 45 47 49 50 51 53 54 109 110 111 112 113 114 115 116 T 52 108 AF 48 107 R 46 D 44 Sensor Type 98 35 43 Protected Area 117 118 119 56 120 57 121 58 122 59 123 60 124 61 125 62 126 63 127 64 128 48 3 55
T AF R D 3 © 2013 Tyco International Ltd. and its Respective Companies. All Rights Reserved. Toronto, Canada • www.dsc.com • Printed in Canada The trademarks, logos, and service marks displayed on this document are registered in the United States [or other countries]. Any misuse of the trademarks is strictly prohibited and Tyco International Ltd. will aggressively enforce its intellectual property rights to the fullest extent of the law, including pursuit of criminal prosecution wherever necessary.