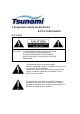
Important safety instructions & FCC information 1.1 Safety CAUTION :TO REDUCE THE RISK OF ELECTRIC SHOK DO NOT REMOVE COVER(OR BACK) NO USER-SERVICEABLE PARTS INSIDE. REFER SERVICING TO QUALIFIED SERVICE PERSONNEL. The lighting flash with arrowhead symbol, Within an equilateral triangle, is intended to alert the user to the presence of un-insulated “dangerous voltage” within the product’s enclosure that may be of sufficient magnitude to constitute a risk of electric shock to persons.
FOR YOUR SAFETY - The space around the receiver should be clear to allow for proper ventilation of the receiver. - Do not cover the receiver or place it on a unit that emits heat - Use a damp soft cloth to clean the casing. - Do not connect or disconnect cables when the receiver is plugged in. - Do not remove the cover. - Do not allow the unit to be exposed to hot, cold or humid conditions. - Never allow liquids, spray or other materials to come into contact with the inside of the receiver.
product manufacturer as they may cause hazards. : Do not use the product near water for example, near a bath, wash bowl, kitchen sink, or laundry tub ; in a wet basement; or rear a swimming pool; and the like. 9) Accessories : Do not place this product on an unstable cart, stand, tripod, bracket, or table. This product may fall, causing serious injury to a child or adult, and serious damage to the product. 10) A product and cart combination should be moved with care.
: The product is equipped with an attachment plug having overload protection. This is a safety feature. See instruction Manual for replacement or resetting of protective device. If replacement of the plug is required, be sure the service technician has used a replacement plug specified by the mnufacturer that has the same overload protection as the original plug.
e) If the product has been dropped or damaged in any way f) When the product exhibits a distinct change in performance-this indicate a need for service. 23) Replacement Parts : When replacement parts are required, be sure the service technician has used replacement parts specified by the manufacturer or have the same characteristics as the original part. Unauthorized substitutions may result in fire, electric shock, or other hazards.
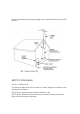
Picture 2) Example of antenna grounding as per national Electrical code, ANSI / NFPA70 1.2 FCC Information FCC ID : PFNDMT1730 This device complies with part 15 of the FCC Rules, Operation is subject to the following two conditions : (1)This device may not cause harmful interference, and (2)This device must accept any interference received, including interference that may cause undesired operation.
Note: This equipment has been tested and found to comply with the limits for a Class B digital device, pursuant to part 15 of the FCC Rules. These limits are designed to provide reasonable protection against harmful interference in a residential installation. This equipment generates, uses and can radiate radio frequency energy and, if not installed and used in accordance with the instructions, may cause harmful interference to radio communications.
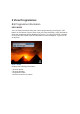
2 View Programmes 2.1 Programme Information INFO MODE You can view information about the current programme by pressing the "Info" button on the Remote Control. Each time you press the button, more information about the programme will be displayed onscreen. To exit INFO MODE, continue to press the “Info” button until the information screens disappear, or press “Exit” at any time.
INFO 2 MODE Displays the following information: • Channel Name • Channel Number • Current Favourite List Name • Today's Date and Time • Channel Favourite Status Button • Programme Monitor Status Button • Programme Start Time • Programme End Time • Programme Theme • Programme Rating • Programme Name • Programme Time Remaining INFO 3 MODE Displays all of INFO 2, plus: • Programme Description • Transparent Window
INFO 4 MODE Displays all of INFO 3, plus: • Opaque Window 2.2 Programme Navigation NAVIGATING INFO MODE Use “Channel +” or “Channel -” to tune to the next or previous available channel. The screen will remain in the INFO MODE you have selected. To exit INFO MODE, continue to press the “Info” button until the information screens disappear, or press “Exit” at any time.
Use the “Right Arrow” button to preview information for the next programme on your current channel. Use the “Up Arrow" and “Down Arrow” buttons to scroll through the channel lineup for information on all programmes in the next time slot. Use the “Left Arrow” button to return to the current time slot. While viewing programme information, press “OK” to select and tune to a programme. If you select “OK” for a programme in the next time slot, your television will tune immediately to that channel.
• Current Time The top left corner of your screen displays the following information about the programme that you have highlighted: • Channel Number • Programme Start Time • Programme End Time • Channel Name • Programme Name • Short Programme Description • Current Favourite List Name The left column lets you scroll through the channels available in your current channel lineup and displays all programmes currently playing.
programmes available on the channel that you have highlighted in the LEFT COLUMN. Use the “Right" arrow on your remote control to browse inside the RIGHT COLUMN. Use "Up" and "Down" arrows to scroll through future programmes. You can return to the LEFT COLUMN by pressing the "Left" arrow at any time. Note: Depending on programme length, the RIGHT COLUMN may not immediately display all future programmes.
the current programme. From this position, use the "UP" arrow on your remote control to start the DAY SHIFTER feature. Once the current date is highlighted, use the "Right" arrow to skip ahead 24 hours from the current time. Each time you press the "Right" button, the display will skip ahead another 24 hours. Use the “Left” arrow to return to the current date. At any time while using the DAY SHIFTER, use the "Down" arrow to browse through the programmes available that day.
If you do not wish to view the current or future programme, return to the Programme Guide by pressing "INFO" on your remote control. You can cancel a timer at any time. Highlight the programme for which a timer has been set and press "OK" on your remote control. You will then be given the option to cancel the timer for that programme. Choose "CANCEL" onscreen by pressing "OK" on your remote control. 2.
Note: If browsing in ALL CHANNELS MODE, the Quick-Edit feature will be turned off. MONITOR PROGRAMMES Press “JUMP” on your Remote Control to toggle between the current channel and the most recently viewed channel. With MONITOR PROGRAMMES, you can increase the number of channels to cycle through. While viewing any programme, access the OPTIONS screen directly by pressing “OK” on your Remote Control. Next, select MONITOR PROGRAMMES by pressing “OK” on your Remote Control and then selecting “DONE” onscreen.
From this screen, you can: • Display All Channels: Quickly reset your current mode to include all available channels. • Select Channel Themes: Choose among several different themes for browsing, such as Movies, Music, or Sports. • Edit Current Favourites: Opens the EDIT FAVOURITE Menu Page, where you can edit the name and lineup of your favourite channel lists. (Section 3.
MENU FEATURES • Favourites • Parental Controls • Digital Set-Top Box Settings • Diagnostics 3.1 Favourites/Themes SELECT FAVOURITE LIST OR BROWSE BY THEME • Display All Channels: Quickly reset your current mode to include all available channels. • Channel Themes: Choose from a variety of different themes for browsing, such as Movies, Music, or Sports.
CHANNEL THEMES You can choose from a variety of different pre-set themes for browsing, such as Movies, Music, or Sports. Select "DONE" onscreen to confirm your selection. EDIT FAVOURITE To change the name of a favourite list, select “Edit Name” onscreen. A cursor will then appear inside the TEXT WINDOW. Use the “Up" and "Down Arrow" buttons on your Remote Control to scroll through the alphabet. You can also include numbers 0-9 in the new name.
numbers 0-9 on your Remote Control, then select “ENTER” onscreen. Note: The first time you set the password, the numbers will appear in the TEXT WINDOW. The next time, the password will appear as asterisks. PARENTAL CONTROLS Parental Control Status: Turns parental controlled channels and rating blocks on or off. Block Channels: Opens the CHANNEL BLOCK screen that lists all available channels. You can select any channel to be blocked from view.
CHANNEL BLOCK Scroll through the channel lineup and choose up to 30 channels to block from view. Select “DONE” onscreen to confirm blocked channels and return to the PARENTAL CONTROLS screen. RATINGS BLOCK You can specify that all programmes of any selected rating will be blocked from view. Select the ratings of the programmes that you would like blocked. Select “DONE” onscreen to confirm blocked ratings and return to the PARENTAL CONTROLS screen.
CHANGE PASSCODE Enter a new passcode using the numbers 0-9 on your Remote Control, then select “ENTER” onscreen. 3.4 Digital Set-Top Box Settings SCREEN SIZE AND LANGUAGE OPTIONS SCREEN FORMAT: Indicate the size of your television screen, Standard Screen (4:3) or Widescreen (16:9). DEFAULT LANGUAGE: Select the language that you would like to appear on all interactive TV screens.
3.5 Diagnostics SYSTEM INFORMATION AND RESET OPTION DISPLAY SYSTEM INFORMATION: Loads the TSUNAMI INSTALLER APPLICATION that is used to monitor and modify system settings. RESET SYSTEM TO FACTORY DEFAULT: Select this button onscreen to open a passcode-protected reset screen, where you can reset all Favourite lists, channel and rating blocks, language preferences, and custom settings to their original factory-installed status.
System Information pages by using the “Left" and "Right Arrow” buttons on your Remote Control. Press “DONE” onscreen to return to the MENU FEATURES screen. RESET SYSTEM To reset your system, enter your password using numbers 0-9 on your Remote Control, then select “RESET” onscreen. WARNING: This will erase all customization including: Favourites, Parental Controls, Default language and Settings. Press “CANCEL” onscreen to return to the DIAGNOSTICS screen. 4 Trouble Shooting 4.
4.2 Message Screens RECEIVE CHANNEL BLOCK AND TROUBLE- SHOOTING MESSAGES ONSCREEN Your Digital Set-Top Box can diagnose most problems that may occur with the video and audio signal, as well as the status of the Smartcard that controls your access to programming. Each MESSAGE SCREEN will provide a tip on what to do in case of trouble. Also, channels or programmes that are BLOCKED or DELETED display a notification message.