UltraFire™ User Manual Copyright: August 2014
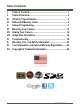
Table of Contents I. II. III. IV. V. VI. VII. VIII. IX. X. XI. XII. 1 Table of Contents ................................................................... 1 Camera Overview ................................................................... 2 UltraFireTM Specifications ....................................................... 3 Batteries & Memory Cards .................................................... 4 Setup & Programming ...........................................................
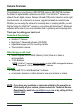
Camera Overview Congratulations on purchasing a RECONYX® camera. RECONYX® has been the leader in digital wildlife cameras since 2002. Your UltraFire™ camera is a state-of-the-art digital camera, Passive Infrared (PIR) motion detector and a night time illuminator, all contained in a secure, rugged and weather-resistant case.
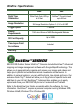
UltraFire™ Specifications Night Time Illumination Image Resolution WR6 XR6 White Flash Color LED up to 60 feet NoGlow™ Covert Infrared up to 80 feet 1080P HD Video with Stereo Audio Still Image Resolution Options: 3.4, 5.0 or 8.
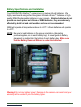
Battery Specifications and Installation Your RECONYX® UltraFire™ camera runs on twelve AA-cell batteries. We highly recommend using either Energizer® Ultimate Lithium™ batteries or highquality NiMH Rechargeable batteries in your camera. Alkaline batteries do not provide as much power as Lithium or NiMH batteries, they are adversely affected by both hot and cold weather and are not recommended. NiMH will operate at temperatures down to -20°F. Lithium batteries will operate to -40°F.
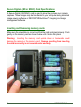
Secure Digital® (SD or SDHC) Card Specifications A Secure Digital (SD/SDHC) card is used to store the pictures your camera captures. These images may be transferred to your computer using standard image viewing software or RECONYX® BuckView™ mapping and image management software. Inserting and Removing memory cards Make sure the orientation is correct and that the card is aligned properly. Push gently on the memory card as shown below until it clicks into place.
To remove memory cards: 1. Press to disarm the camera (the number of pictures and videos taken since last armed will be displayed). 2. Turn the camera off. 3. Press and release the card to partially eject the memory card. 4. The card can then be removed by grasping it with your fingers. NOTE: Always disarm the camera (by pressing OK) and turn the power off before removing or inserting the memory card. Memory Card - File System Requirements Secure Digital cards have various speeds and capacities.
Setup & Programming Insert the SD card and batteries, then turn the camera on by momentarily pressing the “OK” button until the buttons light up. NOTE: If this is the first time you’ve used your camera, it will automatically display the Date/Time setup change option, beginning with Enter Year.
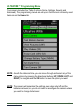
ULTRAFIRE™ Programming Menu Your camera includes four Tabs of options (Home, Settings, Security and Advanced). The programming menus are set up so that the most commonly used items are on the Home tab. NOTE: As with the date and time, you can move through and select any of the menu options by pressing the directional buttons (UP, DOWN, LEFT and RIGHT) to navigate and the OK button to save the option you want.
Home Tab: Main Menu Items Arm Camera – When you select this option, you will be taken to the ARM CAMERA page. You then can confirm that you want the camera to take Still Photos, Videos and utilize a Quiet Period after the motion event. You can use the direction buttons to make your choices regarding these options and then push the OK button once the ARM field is highlighted at the bottom of the screen.
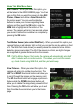
Play Videos – When you select this option, the camera will enter into a slide show function to view thumbnails of the videos on the memory card. The LEFT and RIGHT directional buttons will allow you to scroll through the thumbnails. The UP directional button will play the video while the DOWN directional button will allow you to delete the video being viewed at that time. Pressing the OK button will allow you to exit from the video slide show and return you to the Home page.
Settings Tab: General Settings Change Picture Settings – This page allows the user to change the number of pictures taken (default is 3) per motion event (1 to 10). It also allows you to change the time between each photo (2 to 10 seconds). You can also adjust the image resolution (3, 5 or 8 megapixels). Use the directional buttons to change programming options and then push the OK button once the Save field is highlighted. All programming options will be saved even after the camera is turned off.
Advanced Tab: Advanced Settings Change Time Lapse Settings – This option allows the user to take Time lapse photos/videos based upon a clock function, which is independent of the Motion Sensor. Time Lapse provides you with the benefit of being able to monitor a large area such as a food plot. This screen allows you to turn Time Lapse On or Off and change the Time Interval (1, 5, 15, 30 minutes or 1 hour) between photos/videos.
Mounting Your Camera The camera can be mounted to a tree by using the included adjustable bungee cord (shown below). Simply thread the end without the loop through the camera, then install the included bungee hook and adjust to the length needed to securely fasten the camera to the tree. For added security, a Python™ Cable Lock by MasterLock® can be threaded through the secondary hole also locking the camera latch in place. Visit our website www.reconyx.
Aiming Your Camera PIR Motion Detector The Passive Infrared Motion Detector on your UltraFire™ camera is precisely aligned with the camera lens to give you the best chance of capturing subjects that come into the field of view of the camera, while not capturing pictures of anything that is not in the view of the camera. The motion detector can detect movement up to 100 feet (30.5m) away. However, the detection range is dependent on the temperature of the source in relation to the ambient air temperature.
Motion Sensor Test Mode Learning to use the WalkTest mode is critical to being as successful as possible with your RECONYX® camera. The WalkTest mode allows you to precisely determine your camera’s active motion detection zones – ensuring your camera is aimed exactly where you want to capture animal activity. 1) Secure the camera to a tree or other object aiming the camera toward where you want it to capture pictures. 2) Put camera in Motion Sensor Test mode, and close the camera.
Image Data Information Your RECONYX® UltraFire™ camera stores Image Data along in every picture it takes. Some of this information is displayed on the Image Data bands above and below the image. An M or T in the top data band indicates a “motion” or “time-lapse” event. “1/3” indicates the first in a sequence of three pictures for that event.
Troubleshooting For answers to questions about your RECONYX™ UltraFire™ camera that you cannot find in this Instruction Manual, please contact RECONYX™ Technical Support at support@reconyx.com or call 1-866-493-6064. Firmware Updates You should also periodically check the RECONYX® web site for firmware updates for your camera. We periodically release firmware updates with new features and/or performance enhancements.
camera again. This will ensure that you are running with known settings – with the motion detector ON at HIGH sensitivity and with Time-Lapse OFF. If after going back to the Default settings, you still seem to be getting false triggers, check the physical setup of your camera. The sun should not be shining directly on the face of the camera, and the camera’s field of view should be cleared of as much vegetation as possible. False triggers most occur most on sunny, breezy days.
slowly, it will sometimes not produce a strong enough signal within the sensor to trigger the camera. Memory Card Problems If your camera won’t start up properly and/or displays “card locked”, first check to be sure your card is not “Locked”. On most SD cards there is a switch on the side of the card. If the card is locked, you will not be able to save any photos.
Warranty, FCC, CE and Safety Information RECONYX® Limited Hardware Warranty RECONYX® UltraFire™ cameras are warranted against manufacturers defects in materials and workmanship for a period of two years from the date of purchase. If during this period, through normal use, the product fails due to defects in materials or workmanship, RECONYX™ will either repair or replace the product at our discretion.
Avoid Condensation Moving the camera rapidly between hot and cold temperatures may cause condensation (water droplets) to form on its external and internal surfaces. You can avoid this by placing the camera in an airtight, plastic bag and letting it adjust to temperature changes slowly before removing it from the bag. If Condensation Forms Inside the Camera Stop using the camera immediately if you detect condensation inside the camera. Continued use may damage the camera.
Your Information and Camera Warranty Registration Record Your Information After you have familiarized yourself with this instruction manual, your camera, and software, you should record some basic information here so that you don’t lose it. It is also a good idea to keep your purchase receipt in case you would need warranty work done on your camera. Date Purchased: Place of Purchase: Camera Model: Camera Serial #: CodeLocTM Password: www.reconyx.com Username: www.reconyx.
Copyright & Trademark Information UltraFireTM Instruction Manual Copyright August 2014 Other trademarks and registered trademarks referred to in this document: UltraFire™ and BuckView™ are trademarks of RECONYX®. Google Maps® is a registered trademark of Google, Inc. Facebook® is a registered trademark of FACEBOOK. Twitter® is a registered trademark of Twitter. Secure Digital® (SD and SDHC) are registered trademarks of the SD Association.