
Installation manual

XR6/XR3 Installation Manual Preparing for installation
Issue 3.0 2009-07-15 Page 1-1
Section 1: Preparing for installation
Before installing your XR6/XR3 transmitter, perform the following steps:
1. Ensure that you have performed the pre-installation tasks described in the
XR6/XR3 Pre-installation Manual.
2. Make sure that you received all the components. (Check your packing list.)
3. Inspect all crates and packages for damage.
4. Report any damage immediately to your Nautel sales representative and the carrier.
5. Move the crates as close as possible to the transmitter’s planned location.
6. Unpack the crates in accordance with the instructions provided on the outside of the crates.
• For each crate, remove the panel labelled open this side. The panel is attached using
Philips head screws.
• Remove any visible packing material, including braces, from the crate's interior.
7. Review any assembly notes or instructions contained inside the transmitter crates. (For sites
requiring custom configurations, the instructions provided with the transmitter replace the
instructions provided here.)
8. Assemble your parts and tools.
For a list of required tools, see “Parts and tools” on page 12-1.
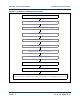
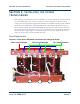
9. When you are ready to install the XR6/XR3 transmitter, follow the steps shown in
Figure 1.1 on page 1-2.
TIP When you have completed a task or step, put a check mark beside the step
number.
CAUTION:
FAILURE TO COMPLY WITH RECOMMENDATIONS MAY VOID YOUR MANUFACTURER’S
WARRANTY. FOR MORE INFORMATION, REVIEW YOUR WARRANTY DOCUMENTS.