XR10 User’s Guide XR10 User’s Guide
Silencing an Alarm All/Perimeter and Home/Away Systems 1. While the alarm bell or siren is sounding, enter your user code. The keypad displays DISARM SILENCE. 2. Press the SELECT key under SILENCE to stop the bell or siren. This does NOT disarm the system. 3. If your system is programmed to send an Abort (alarm cancel) report to the central station, the keypad displays ALARM CANCELLED. Area Systems 1. While the alarm bell or siren is sounding, enter your user code.
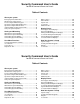
Security Command User's Guide for XR10 Command Processor Panels Table of Contents About your system Emergency Evacuation Plans ....................................... ii About Your Security System .......................................... 1 The Security Command Keypad ................................... 2 Special Security Command Messages ......................... 3 Special Security Command Tones ................................ 3 Understanding Security System Terms .........................
Emergency Evacuation Plans The National Fire Protection Association recommends that you establish an emergency evacuation plan to safeguard lives in the event of a fire or other emergency. Use the following steps as a guide. First Floor Draw a floorplan of your home or business Second Floor Fire Escape On a clean sheet of paper, draw the walls, windows, doors, and stairs. Also draw any obstacles that a person may encounter while exiting the building such as large furniture or appliances.
Introduction About Your Security System A Note About False Alarms Your Security Command system has been designed with your safety and comfort in mind. It uses the latest in computer technology to create the most user friendly security and fire system on the market today. One of the most important concerns facing the security industry today is false alarms. The accidental dispatching of police and fire agencies places others in jeopardy by limiting the response capability of those emergency service units.
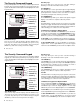
The Security Command Keypad Your system may have one or more easy to use Security Command keypads (16 or 32 character) that allow you to properly operate the system.
Special Security Command Messages As you use your system, you’ll occasionally see a keypad display that asks you to enter a code or that describes a condition on the system. Below are some examples of the displays you'll see: ALARM A 24 hour zone (for example, fire or panic) or an armed burglary zone has been faulted. Your system may sound bells or sirens. ALARM CANCELLED An authorized user has cancelled an alarm condition by entering their security code.
Understanding Security System Terms Throughout this guide, and in some displays on your keypad, you’ll see certain words or phrases that might be unfamiliar. Although every effort has been made to use terms that are commonly known, there are some for which there was no acceptable substitute. Entry or Exit Zone Almost all systems have one or more doors through which you can enter or exit the premises.
Understanding Security System Terms Central Station Monitoring Your system can also be programmed to automatically send alarm, trouble, and arming and disarming reports to a central station. Operators at the central station can in turn dispatch the appropriate authorities or contact you with the specific event information. Status Status is a feature that automatically displays the armed or disarmed status of your system on the Security Command keypads.
How your System Operates Your system has been programmed to operate in one of two modes: All/Perimeter, or Home/Away. • All/Perimeter - In this mode you select All to turn on the entire system or Perimeter to turn on just the exterior door and window protection when you're inside. • Home/Away - In this mode you select Away to turn on the entire system or Home to turn on just the exterior door and window protection when you're inside.
All/Perimeter System Arming Area Assignment: Your security system is divided into two separate areas. Motion detectors, inside doors, and other interior protection devices are assigned to the Interior area while windows and exterior doors are assigned to the Perimeter area. Perimeter or All: When arming an All/Perimeter system, the keypad displays PERIM ALL. If you select ALL, you arm both the Perimeter and the Interior of the system.
All/Perimeter System Disarming Disarming: While the system is armed, you can only enter the premises through an entry/exit delay door without causing an alarm. After opening the door, the Security Command keypad sounds a prewarn tone to remind you to disarm the system. You must disarm the system before the prewarn tone expires or an alarm on the door zone will occur. During the prewarn tone, the keypad displays ENTER CODE:. Enter your security code to disarm the system.
Home/Away System Arming Area Assignment: Your security system is divided into two or three separate areas. Motion detectors, inside doors, and other interior devices are assigned to an Interior and possibly Bedroom area while windows and exterior doors, are assigned to a Perimeter area. Arming the system: When arming a Home/Away system, the keypad displays HOME AWAY or HOME SLEEP AWAY. If you select AWAY, you arm all areas of the system. You’ll want to arm all areas when leaving with nobody staying inside.
Home/Away System Disarming Disarming: While the system is armed, you can only enter the premises through an entry/exit delay door without causing an alarm. After opening the door, the Security Command keypad sounds a prewarn tone to remind you to disarm the system. You must disarm the system before the prewarn tone expires or an alarm on the door zone will occur. During the prewarn tone, the keypad displays ENTER CODE:. Enter your code to disarm the system.
Security Command User Menu Sensor Reset Many of the features of your system have been put into a User Menu you can access from any Security Command keypad. The menu requires you to enter your user code and then only shows those functions to which you have access. User Code Level: Master or Standard To access the User Menu: 1. Press the COMMAND key until MENU? NO YES displays. 2. Select YES. The keypad displays ENTER CODE: –. Enter your user code.
Outputs On Off Bypass Zones User Code Level: Master or Standard. User Code Level: Master or Standard. Function: Allows you to turn the system's outputs on and off. Function: Allows you to bypass a zone prior to arming the system. This function is used to individually turn your system’s relay outputs on and off. Your system may use these outputs to control interior and exterior lighting, or heating, air conditioning, or other appliances.
Zone Monitor User Code Level: Master and Standard. Function: Allows the system to monitor selected disarmed zones (doors, windows, or motion detectors) and sound a tone at the keypad as well as display their name on the keypad display as they're faulted. This is an ideal feature for monitoring door zones to tell when someone comes in or goes out. You can place any combination of disarmed zones in Zone Monitor but only the most recent zone faulted is displayed.
System Test User Codes User Code Level: Master or Standard. User Code Level: Master only. Function: System Test is used to test the battery, alarm bell or siren, and communication to a central station. The System Test function begins automatically as soon as you select it. Function: Allows you to add or delete a user from the system or change their security code or authority level. Using the System Test Function 1. Access the User Menu. 2. Press the COMMAND key until SYSTEM TEST? displays. 3.
User Codes continued User Code Authority Levels System Options Standard Master Sensor Reset Outputs On/Off Zone Monitor System Test Arm and Disarm Display Events User Codes √ √ √ √ √ √ √ √ √ √ √ √ √ 7. The display changes to MASTER? NO YES. Select YES to make this a Master code level with the authority to Add, Delete, and Change user code information. Selecting NO displays TEMP CODE NO YES. Master code levels do not display TEMP CODE. • NO makes this a permanent user code with Standard authority.
User Codes continued Deleting User Code Numbers: Changing User Code Numbers 1. Access the User Menu. 1. Access the User Menu. 2. Press the COMMAND key until USER CODES? displays. 2. Press the COMMAND key until USER CODES? displays. 3. Press any one of the SELECT keys. The keypad displays ADD DEL CHG. 3. Press any one of the SELECT keys. The keypad displays ADD DEL CHG. 4. Press the SELECT key under DEL to delete a user code from the system.
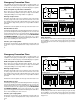
Display Events The event display you'll see at the keypad is slightly different for each event type. User Code Level: Master or Standard. Function: Allows you to review up to 16 past events that occurred on your system from any keypad. Once 16 events are stored, any new event causes the oldest event to be cleared. SELECT keys When accessed, the Display Events option displays events recorded JONES RESIDENCE automatically by the system in the F R I 2 : 51 AM order of their occurrence.
Zone Event Displays Arming and Disarming Event Displays This section displays alarms, troubles, and other events that could occur on your system's protection zones. This displays any arming or disarming of system areas. Display Description JONES RESIDENCE 2 BURG ALR A burglary alarm occurred on zone 2. Press the SELECT key under the zone number to display the custom zone name programmed into the system. Zone Type - There are 7 possible zone types you may see here.
User Code Change Event Displays User Checkin Event Displays This displays any addition, deletion, or change to a user code. This shows when a user selected the pager CHECKIN feature from the User Menu. See page 11 for more information. Display JONES RESIDENCE 9 ADD 12 Description User 9 added user 12 to the system. Display JONES RESIDENCE CHECKI N 1 1 Description User 11 selected the CHECKIN feature in the system's User Menu.
System Setup Security Command keypads We've provided this System Setup section to allow you to track the current and future status of the programmable options on your Security Command system. If you make changes to the system, you should update the information contained on these pages. Address Locations 1 2 Your system is monitored by a central station.
User Codes Notes Your system provides you with twelve user codes you can program for individual users. As you add new users or change current user's codes, you can keep track of their name, user number, and authority level here in this section. Use this section to record your own notes or observations about the status or operation of your system.
LT-0226 (4/97) LT-0226 (4/97)