
Programming instructions


Digital Monitoring Products XR500 Series Programming Guide
4
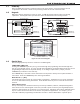
inTroduCTion
Duringprogramming,theSelectkeys/areasalsoallowyoutochangeinformationcurrentlyinpanel
memorybypressingtheappropriateSelectkey/areaunderoronthedisplay.Youthenenterthenew
information using the keypad data entry digit keys.
Whentherearemorethanfourresponseoptionsavailable,presstheCOMMANDkeytodisplaythenextone
to four options. Pressing the Back Arrow key allows you to review the previous four choices.
TheSelectkeys/areasarealsousedforchoosingasectionfromtheprogrammingmenu.PressanySelect
key or touch the Select Area when the programming section name you want displays.
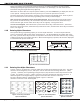
Note: On Security Command, Thinline and Aqualite keypads,wheninstructedtopresstherstSelect
key, press the far left Select key; the second Select key is the second from the left; third Select key is
secondfromtheright;andthefourthSelectkeyisthefarrightkey.SeeFigures6and7.
On Clear Touch Keypads,wheninstructedtopresstherstSelectkey,touchSelectArea1;thesecond
SelectkeytouchSelectArea2;thirdSelectkeytouchSelectArea3;andthefourthSelectkeytouchSelect
Area4.SeeFigure8.
1.10 Entering Alpha Characters
Some options during programming require you to enter alpha characters. To enter an alpha character,
press or touch the key that has that letter written below it. The keypad displays the number digit of the
key.Next,presstheSelectkey/areathatcorrespondstothelocationoftheletterunderthekey.Pressing
adifferentSelectkey/areachangestheletter.Whenanotherdigitkeyispressed,thelastletterdisplayed
is retained and the process starts over.
First Letter Second LetterThird Letter Special Character
(CBA
First Letter
Second Letter
Third Letter
Special Character
(CBA
Figure 6: Security Command Select Keys Figure 7: Thinline/Aqualite Select Keys
32-Character Display
Select Area 1
Select Area 2
Select Area 3
Select Area 4
Figure 8: Clear Touch Select Areas
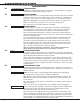
1.11 Entering Non-Alpha Characters
Toenteraspaceinanalphaentry,pressthe9digitkeyfollowedbythethirdSelectkey/area.Thethree
charactersonthe9digitkeyareY,Z,andspace.Youcanalsoenterthefollowingcharacters:–(dash),
.(period),*(asterisk),and#(poundsign)usingthe0(zero)keyandthefourSelectkeys/areasfromleft
toright.Forexample,toentera–(dash),pressthe0(zero)keyandthentheleftSelectkey/area.A
dash now appears in the keypad display. Figures 9 and 10 show the character location for
Security Command, Thinline, and Aqualite keypads. Figure 11 shows the
character locations for Clear Touch keypads.
1 2 3 4
9 0 CMD
5 6 7 8
A
C
B
D
F
E
G
I
H
J
L
K
V
X
W
S
U
T
P
R
Q
M
O
N
Y
(space)
Z
-
#
*
.
Figure 9: Security Command Figure 10: Thinline/Aqualite
Special Characters Special Characters
ABC DEF GHI
JKL MNO PQR
STU VWX YZ
(SPACE)_
–.*#
Figure 11: Clear Touch
Special Characters