XR20 User’s Guide XR20 User’s Guide
Silencing an Alarm All/Perimeter and Home/Away Systems 1. While the alarm bell or siren is sounding, enter your user code. The keypad displays DISARM SILENCE. 2. Press the SELECT key under SILENCE to stop the bell or siren. This does NOT disarm the system. 3. If your system is programmed to send an Abort (alarm cancel) report to the central station, the keypad displays ALARM CANCELLED. Area Systems 1. While the alarm bell or siren is sounding, enter your user code.
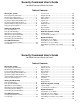
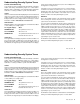
Security Command User's Guide for XR20 Command Processor Panels Table of Contents About your system Emergency Evacuation Plans ....................................... ii About Your Security System .......................................... 1 The Security Command Keypad ................................... 2 Special Security Command Messages ......................... 3 Special Security Command Tones ................................ 3 Understanding Security System Terms .........................
Emergency Evacuation Plans The National Fire Protection Association recommends that you establish an emergency evacuation plan to safeguard lives in the event of a fire or other emergency. Use the following steps as a guide. First Floor Draw a floorplan of your home or business Second Floor Fire Escape On a clean sheet of paper, draw the walls, windows, doors, and stairs. Also draw any obstacles that a person may encounter while exiting the building such as large furniture or appliances.
Introduction About Your Security System A Note About False Alarms Your Security Command system has been designed with your safety and comfort in mind. It uses the latest in computer technology to create the most user friendly security and fire system on the market today. One of the most important concerns facing the security industry today is false alarms. The accidental dispatching of police and fire agencies places others in jeopardy by limiting the response capability of those emergency service units.
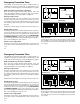
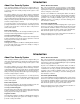
The Security Command Keypad Your system may have one or more easy to use Security Command keypads (16 or 32 character) that allow you to properly operate the system. The illustration and descriptions below highlight some of the keypad features: 32-Character Keypad AC LED POWER Lighted display JONES RESIDENCE F R I 2 : 51 AM SELECT keys 1 3 2 AB C 5 9 JKL The ARROW key The ARROW key is used to go back through the keypad displays while operating your system.
Special Security Command Messages As you use your system, you’ll occasionally see a keypad display that asks you to enter a user code or that describes a condition on the system. Below are some examples of the displays you'll see: SYSTEM TROUBLE or SERVICE REQUIRED ALARM Special Security Command Tones A 24 hour zone (for example, fire or panic) or an armed burglary zone has been faulted. Your system may sound bells or sirens.
Understanding Security System Terms Throughout this guide, and in some displays on your keypad, you’ll see certain words or phrases that might be unfamiliar. Although every effort has been made to use terms that are commonly known, there are some for which there was no acceptable substitute. Below are some terms you’ll see here and on your keypad display: Arming This is the term used for turning on the burglary protection in one or more areas of the system. Your system may require you to enter a user code.
Understanding Security System Terms Central Station Monitoring Your system can also be programmed to automatically send alarm, trouble, and arming and disarming reports to a central station. Operators at the central station can in turn dispatch the appropriate authorities or contact you with the specific event information. Status Status is a feature that automatically displays the armed or disarmed status of your system on the Security Command keypads.
How your System Operates Your system has been programmed to operate in one of three modes: Area Arming, All/Perimeter, or Home/Sleep/Away. • Area Arming - Your burglary protection is divided into up to four areas. Each area can have a custom name, be turned on or off independently of other areas, and limit access to only those users with the proper authority. • All/Perimeter - Your burglary protection is divided into two areas: Interior and Perimeter.
Area System Arming Area Assignment: Your security system has been programmed into separate areas. The number of areas and their names are listed in the back of this guide. Arming or Disarming: You can arm and disarm all areas at one time or each area individually. You can only arm or disarm areas authorized for your user code. All or Selective Arming: After entering your user code, the system allows you to arm either all of the areas to which you have access or one or more selected areas.
Area System Disarming Disarming: While the system is armed, you can only enter the premises through an exit/entry delay door without causing an alarm. After opening the door, the Security Command keypad sounds a prewarn tone to remind you to disarm the system. You must disarm the system before the delay time expires or an alarm on the door zone will occur. During the prewarn tone, the keypad displays ENTER CODE: Enter your user code to disarm the system.
All/Perimeter System Arming Area Assignment: Your security system is divided into two separate areas. Motion detectors, inside doors, and other interior protection devices are assigned to the Interior area while windows and exterior doors are assigned to the Perimeter area. Perimeter or All: When arming an All/Perimeter system, the keypad displays PERIM ALL. If you select ALL, you arm both the Perimeter and the Interior of the system.
All/Perimeter System Disarming Disarming: While the system is armed, you can only enter the premises through an entry/exit delay door without causing an alarm. After opening the door, the Security Command keypad sounds a prewarn tone to remind you to disarm the system. You must disarm the system before the prewarn tone expires or an alarm on the door zone will occur. During the prewarn tone, the keypad displays ENTER CODE:. Enter your user code to disarm the system.
Home/Away System Arming Area Assignment: Your security system is divided into two or three separate areas. Motion detectors, inside doors, and other interior devices are assigned to an Interior and possibly Bedroom area while windows and exterior doors, are assigned to a Perimeter area. Arming the system: When arming a Home/Away system, the keypad displays HOME AWAY or HOME SLEEP AWAY. If you select AWAY, you arm all areas of the system. You’ll want to arm all areas when leaving with nobody staying inside.
Home/Away System Disarming Disarming: While the system is armed, you can only enter the premises through an entry/exit delay door without causing an alarm. After opening the door, the keypad sounds a prewarn tone to remind you to disarm the system. You must disarm the system before the prewarn tone expires or an alarm on the door zone will occur. During the prewarn tone, the keypad displays ENTER CODE:. Enter your code to disarm the system.
Security Command User Menu Sensor Reset Many of the features of your system have been put into a User Menu you can access from any Security Command keypad. User Code Level: Master or Standard To access the User Menu: 1. Press the COMMAND key until MENU? NO YES displays. 2. Select YES. The keypad displays ENTER CODE: –. Enter your user code. You can now scroll down through the list of system features available to your authority level.
Outputs On Off Bypass Zones User Code Level: Master or Standard. User Code Level: Master or Standard. Function: Allows you to turn the system's outputs on and off. Function: Allows you to bypass a zone prior to arming the system. This function is used to individually turn your system’s relay outputs on and off. Your system may use these outputs to control interior and exterior lighting, or heating, air conditioning, or other appliances.
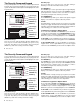
Zone Monitor User Code Level: Master and Standard. Using the Zone Monitor Function Function: Allows the system to monitor selected disarmed zones (doors, windows, or motion detectors). When a monitored zone is tripped, the keypad sounds a tone and displays the zone name. This is an ideal feature for monitoring door zones to tell when someone comes in or goes out. 1. Access the User Menu. You can place any combination of disarmed zones in Zone Monitor but only the most recent zone tripped is displayed.
System Test User Codes User Code Level: Master or Standard. User Code Level: Master only. Function: System Test is used to test the battery, alarm bell or siren, and communication to a central station. The System Test function begins automatically as soon as you select it. Function: Allows you to add or delete a user from the system or change their user code or authority level. Using the System Test Function 1. Access the User Menu. 2. Press the COMMAND key until SYSTEM TEST? displays. 3.
User Codes continued User Code Authority Levels System Options Standard Master Sensor Reset Outputs On/Off Bypass Zones Zone Monitor System Test Arm and Disarm Display Events Schedules Date and Time User Codes √ √ √ √ √ √ √ √ √ √ √ √ √ √ √ √ √ Adding User codes: 1. Access the User Menu. 2. Press the COMMAND key until USER CODES? displays. 3. Press any SELECT key. The keypad displays ADD DEL CHG. 4. Press the SELECT key under ADD to add a new user code.
User Codes continued Deleting User codes: 1. Access the User Menu. 2. Press the COMMAND key until USER CODES? displays. 3. Press any one of the SELECT keys. The keypad displays ADD DEL CHG. 4. Press the SELECT key under DEL to delete a user code from the system. You must have a Master user code level to be able to delete a user code. 5. At the USER NUMBER: - prompt, enter the user number you want to delete and press COMMAND. The displays changes to USER # DELETED. 6.
Schedules User Code Level: Master only. Function: The Schedules function allows you to program into the system the times at which you normally turn your burglary protection on and off each day of the week. This information can then be used by the system to automatically arm or disarm the burglary protection. You can also use the Closing Check/Extend feature with Schedules to help ensure your system is armed by an authorized user at a specific time.
Date and Time User Code Level: Master only. Function: Allows you to change the current date and time displayed on the keypad and used by the system for schedules and Display Events. 7. Press the SELECT key under DATE to change the date. The keypad displays: MONTH: – Enter one or two digits for the month. Press COMMAND. DAY: – Enter up to two digits for the day. Press COMMAND. Setting the Date and Time 1. Access the User Menu. 2. Press COMMAND until TIME? displays.
Display Events User Code Level: Master or Standard. Function: Allows you to review up to 100 past events that occurred on your system from any keypad. Once 100 events are stored, any new event causes the oldest event to be cleared. SELECT keys Note: This section shows the User's Guide Display Events items for both 16-character (single line) and 32character keypad displays. While in the Display Events function, use the COMMAND and ARROW keys to go forward or backward through the list of events.
Zone Event Displays Arming and Disarming Event Displays This section displays alarms, troubles, and other events that could occur on your protection zones. This displays any arming or disarming of system areas. 16-Character Display Description ARM Area 3 has been armed by user 12. Press the left Select key for the area name. Press the right Select key for the time the arming occurred. 16-Character Display Description 2 BURG ALR 1017 A burglary alarm occurred on zone 2.
User Code Change Event Displays System Monitor Event Displays This displays any addition, deletion, or change to a user code. This displays any loss of the system's AC power or battery. 16-Character Display Description 16-Character Display Description 12 ADD 19 1017 User 12 added user 19 on Oct. 17. Press the right Select key for the time this occurred. POWER TBL 1017 An AC failure occurred on the system. Press the right Select key for the time.
System Setup Protection Areas We've provided this System Setup section to allow you to track the current status of the programmable options on your Security Command system. If you make changes to the system, you should update the information contained on these pages. Number Description 1 2 My system is monitored by a central station. ❏ Yes ❏ No 3 4 C/S Name: Address: Outputs City/State: Your system has 4 outputs that can be used for various functions.
User User Name Level Temp Code Areas Arm Only 1 M S Y N 1 2 3 4 Y N 2 M S Y N 1 2 3 4 Y N 3 M S Y N 1 2 3 4 Y N 4 M S Y N 1 2 3 4 Y N 5 M S Y N 1 2 3 4 Y N 6 M S Y N 1 2 3 4 Y N 7 M S Y N 1 2 3 4 Y N 8 M S Y N 1 2 3 4 Y N 9 M S Y N 1 2 3 4 Y N 10 M S Y N 1 2 3 4 Y N 11 M S Y N 1 2 3 4 Y N 12 M S Y N 1 2 3 4 Y N 13 M S Y N 1 2 3 4 Y N 14 M S Y N 1 2 3 4 Y N 15 M S Y N 1 2 3 4 Y N 16 M S Y N 1 2
User Codes User User Name Level Temp Code Areas Arm Only 17 M S Y N 1 2 3 4 Y N 18 M S Y N 1 2 3 4 Y N 19 M S Y N 1 2 3 4 Y N 20 M S Y N 1 2 3 4 Y N 21 M S Y N 1 2 3 4 Y N 22 M S Y N 1 2 3 4 Y N 23 M S Y N 1 2 3 4 Y N 24 M S Y N 1 2 3 4 Y N 25 M S Y N 1 2 3 4 Y N 26 M S Y N 1 2 3 4 Y N 27 M S Y N 1 2 3 4 Y N 28 M S Y N 1 2 3 4 Y N 29 M S Y N 1 2 3 4 Y N 30 M S Y N 1 2 3 4 Y N 31 M S Y N 1 2 3 4 Y N
Easy Entry™ User's Guide This section of the user's guide provides information on using the Easy Entry™ access control capability of the security command system. If your system is not currently using any access control devices, disregard this section. Easy Entry™ is built into every Security Command system and can be accessed using Easy Entry™ keypads. There are three different operating modes: Door Strike, Arming and Disarming, and Entry Delay.
PERIM ARMING AND DISARMING AN ALL/PERIMETER SYSTEM Press Command. The keypad displays PERIM ALL (when arming) or DISARM?. Press the Select key under the option. The keypad displays ENTER CODE: -. ALL The system arms or disarms the areas and activates the Door Strike relay. or DISARM? POWER Present your card to the reader. Once it is validated by the system, both areas arm or disarm automatically and the Door Strike relay activates.
Pager Direct™ User's Guide Pager Direct uses the reporting capability of your security system to dial your pager number and send reports in much the same way as someone sending you a pager message would do. You can receive reports of alarms, troubles, or armings and disarmings of the system and know at a glance the status of your system.
Numeric Pager Display 00128–301 234 Account Number Whenever the system sends a message to your pager, it will always send the account number first to identify itself.
PhoneAccess™ User's Guide This exciting feature allows you to call your XR20 system from any outside touchtone phone to arm and disarm protection areas or turn on or off the panel's relay outputs. Quick Reference Wallet Card How it works 1. From a touchtone phone, call the XR20 system's phone number. 2. The XR20 answers the call and sounds a short ready tone. You now have 8 seconds to enter a valid Master user code.
1. Call the panel phone number. The panel answers and sounds one short tone. 2. Enter your code within 8 seconds. One beep means the code is good. Four short beeps means enter it again. You have 3 tries. 3. You have 30 seconds to enter the first command (see other side) and 30 seconds for each additional command. If All areas are armed Area 1 (Perim) is armed Any area is armed All areas are disarmed You'll hear 3 short beeps 1 short beep 2 short beeps 1 long beep 1. Call the panel phone number.
FA113 User's Guide These instructions guide you through the operation of the XR20 Command Processor system using the FA113 Wireless Keychain Remote. The FA113 uses the audible output capability of the Security Command keypad to sound confirmation tones. It is recommended that you use the FA113 within hearing distance of these keypads. Arming a Home/Away or All/Perimeter System 1. Press the ON button once to arm the Perimeter burglary protection.
Index Alarm displays how long in display 5 Ambush codes 18 Arming All/Perimeter mode 9, 28 Area mode 7, 27 Home/Away mode 11, 28 Instant mode 9, 11 through the telephone 31 using Easy Entry™ 27 with doors and windows open 6 BAD display 6 Bypassing a zone 14 restoring a bypassed zone 14 zones that can't be bypassed 14 Checkin reports to pager 13 CLOSING TIME! display 19 DIALING display 6 Disarming, 1, 4 alarm display 8, 10, clears alarm displays 5 during an alarm 10, 12 Easy Entry™ keypads 27 Easy Exit™ feat