
User's Manual


24
5
Using the
Spyder Pod
System
User’s GUide
SPYDER
POD
VEHICLE CAMERA
MOUNTING SYSTEM
19
23
20
21
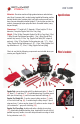
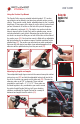
Using the Suction Cup Mounts
The Spyder Pod’s vacuum-actuated industrial grade 4.75” suction
cup mounts can be affixed to just about any smooth surface on any
vehicle. They provide a solid, stable, adjustable base for the 3 variable
length legs. A few pumps of the large pin on the side of each unit and
you are in business. A red line on the side of the pin will disappear
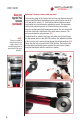
once adhesion is achieved (19). The built-in low suction indicator
helps to insure that the Spyder Pod, and its valuable cargo, remain
securely attached to your vehicle. Releasing the suction when you
are done is as simple as lifting one or both of the tabs on the sides of
the suction cups (20). Each suction mount is fitted with an adjustable
ball joint allowing for an extensive range of lockable positions for the
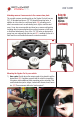
attached legs (21). The suction cup mount units are each contained in
their own soft cloth bag to keep them clean and undamaged so that
adhesion will be optimized every time they are used (22).
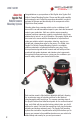
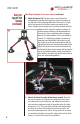
Adjusting leg lengths and angles
Three adjustable length legs screw into the camera base plate ratchet
joints at one end (23) and into the adjustable locking ball joint at the
top of the 3 suction cup mounts on the other end (24). The nine leg
extension rods are all 7/8” in diameter. Three rods are
provided for each length – 3”, 6” & 12”. These rods can
be linked together in any combination you need to create
the perfect length Spyder Pod legs to fit your shooting
situation, positioning the Spyder Pod unit at a variety of
distances and angles from the vehicle (25).
22
25