SPYDER POD VEHICLE CAMERA MOUNTING SYSTEM USER’s GUIDE
Table of Contents About the Spyder Pod Vehicle Camera Mounting System 2 Specifications 3 What’s Included 3 Key Features 4 Using the Spyder Pod System 5 Using the suction cup mounts 5 Adjusting leg lengths & angles 5 Adjusting & locking camera plate leg joints 6 Attaching camera & accessories to the camera base plate 7 Mounting the Spyder Pod to your vehicle 7 Using the Spyder Pod Safety Kit 9 Vehicle Mounting Options 10 Care & Maintenance 12 Cautions & Warn
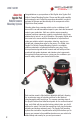
User’s Guide About the Spyder Pod Vehicle Camera Mounting System SPYDER POD VEHICLE CAMERA MOUNTING SYSTEM Congratulations on your purchase of this Digital Juice Spyder Pod Vehicle Camera Mounting System. Please read this guide carefully before using the unit. Follow the procedures described, in order to optimize the lifespan and functionality of the components of this Digital Juice Gear product.
SPYDER POD User’s Guide VEHICLE CAMERA MOUNTING SYSTEM Specifications Materials: Precision-machined high-grade aluminum and stainless steel (legs & camera plate), sealed spring-loaded ball bearing positive locking ratchet joints (camera plate), soft cloth suction mount carry bags, vacuum-actuated industrial-grade 4.75-inch rubber suction cup mounts, heavyweight nylon polyester fabric & sueded leather (carry bag and straps) Dimensions: 13” height x 8.5” diameter / 33cm height x 21.
SPYDER POD User’s Guide VEHICLE CAMERA MOUNTING SYSTEM Spyder Pod Key Features • Quick and easy to set up on any vehicle with any camera rig or configuration. Variable length legs, adjustable ball joints on top of each suction cup, ratcheting attachment joints and a variety of accessory mount and safety tether options mean you can adapt the Spyder Pod to any shooting situation quickly and easily (13). • Vacuum-actuated industrial grade 4.
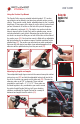
SPYDER POD User’s Guide VEHICLE CAMERA MOUNTING SYSTEM Using the Suction Cup Mounts The Spyder Pod’s vacuum-actuated industrial grade 4.75” suction cup mounts can be affixed to just about any smooth surface on any vehicle. They provide a solid, stable, adjustable base for the 3 variable length legs. A few pumps of the large pin on the side of each unit and you are in business. A red line on the side of the pin will disappear once adhesion is achieved (19).
SPYDER POD User’s Guide Using the Spyder Pod System (continued) NOTE: There is no need to wrench the lock ring tightly closed—the lock will engage with a gentle twist in the right direction. VEHICLE CAMERA MOUNTING SYSTEM Adjusting & locking camera plate leg joints The mounting stage of the Spyder Pod has three leg attachment points that are each fitted with two positive locking ratchet joints, one for tilt (26) and one for swivel (27).
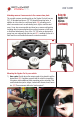
SPYDER POD User’s Guide VEHICLE CAMERA MOUNTING SYSTEM Attaching camera & accessories to the camera base plate The versatile camera mounting plate on the Spyder Pod unit has one 3/8”-16 threaded and eleven 1/4”-20 threaded mounting holes, in addition to a thru-hole for each thread pitch (30), allowing you to attach accessories such as articulating arms, lights, monitors and more.
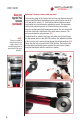
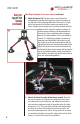
User’s Guide Using the Spyder Pod System (continued) 34 SPYDER POD VEHICLE CAMERA MOUNTING SYSTEM Mounting the Spyder Pod to your vehicle (continued) 2) Mount the Spyder Pod: Construct your custom Spyder Pod configuration by attaching three legs to the suction cup mounts at one end and to the camera base plate at the other end (34). Figure out the best placement of the three suction cup mounts on the vehicle, taking into account where the smoothest surfaces and best adhesion will be.
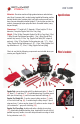
SPYDER POD User’s Guide VEHICLE CAMERA MOUNTING SYSTEM Using the Spyder Pod System (continued) 36 Using the Spyder Pod Safety Kit The safety kit provided with the Spyder Pod includes 2 suction mount safety anchors with heavy duty metal loops (37), 3 variable length safety straps (38), 2 pinch strap anchors (39), 2 velcro anchor straps (40), 2 carbiner anchor straps (41) and a convenient set of soft cloth bags to keep everything organized and clean between uses (42).
SPYDER POD User’s Guide Using the Spyder Pod System (continued) VEHICLE CAMERA MOUNTING SYSTEM Using the Spyder Pod Safety Kit (continued) anchor strap/suction safety mount combination (43). Which type of anchor you use depends on where it is needed. Pinch anchors work well wedged between a door and door frame (44) or between a car hood and hood lock channel. The sturdy Velcro strap anchors can be used to securely loop around a car mirror, hitch or any other surface you can safely wrap around.
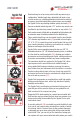
SPYDER POD User’s Guide VEHICLE CAMERA MOUNTING SYSTEM Spyder Pod Vehicle Mounting Options (continued) 47 48 49 3) Mounting the Spyder Pod on the hood of a car allows you to capture the car’s interior through the windshield (48). For this shot you can mount the camera directly to the mounting stage of the Spyder Pod. This setup allows you to see the motion of the exterior of the vehicle and its surroundings, as well as the reflections in the windshield. Once again, this will save you time in post.
SPYDER POD User’s Guide VEHICLE CAMERA MOUNTING SYSTEM Spyder Pod Care & Maintenance 51 52 Spyder Pod Cautions & Warnings The Spyder Pod kit includes a sturdy, compact 50 carry bag carefully designed to hold and protect the various components of the Spyder Pod system (50). Returning the various components to their original placement within the bag (51) will ensure your Spyder Pod remains in the best workable condition.
SPYDER POD VEHICLE CAMERA MOUNTING SYSTEM Digital Juice, Inc. warrants all Digital Juice-built Spyder Pods and accessories purchased new by original owner to be free from defects in the material and workmanship under normal use for a period of 24 months from the date of purchase. Warranty is void when misuse or neglect is the cause. THIS WARRANTY IS VALID ONLY IN THE UNITED STATES AND CANADA.
www.digitaljuice.