
User guide


MR-1000 user guide V1.3
14
10.5. Create Virtual Machine with VirtualBox application
1. Open VirtualBox Select ”New” ”Create Virtual Machine” view appears
2. Write name ”XR7_GUI”, choose ”Linux” and version ”Debian (32 bit)” Press Next
3. Select memory size. Recommended size is 512 MB which would be enough.
Press Next
4. ”Use an existing hard drive file”
5. Press and select “xr7-gui.vdi” file from here “C:\Program
Files\Oracle\VirtualBox\xr7-gui.vdi”. Press Open
6. Press “Create”
7. Virtual machine is created.
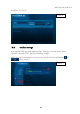
10.6. Virtual machine setup
1. Open VirtualBox and select File Preferences Network
2. Select “VirtualBox Host-Only Ethernet Adapter” from “Host-only Networks” window.
NOTE! If “VirtualBox Host-Only Ethernet Adapter” doesn’t exist you can create it by
button
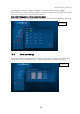
3. Press ”tool button” to make “Host-only Network Details”.
4. On “Adapter” sheet you can define used IP-address. In this guide we use following
address:
IPv4 Address: 192.168.6.1
IPv4 Network Mask: 255.255.255.0
5. Select “DHCP” sheet and Enable server. Server addresses are following:
Server Address: 192.168.6.10
Server Mask: 255.255.255.0
Lower Address Bound: 192.168.6.100
Upper Address Bound: 192.168.6.254
6. Press OK.
7. Press OK to VirtualBox-Settings window.
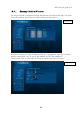
8. Press “settings” on VirtualBox Manager main window. Select “Network”
9. On “Adapter 1” sheet “Enable Network Adapter” which is Attached to “NAT”
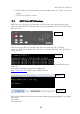
10. Press “Advanced” “Port Forwarding”
11. Press button “Rule1” appears
12. Insert ”Rule1” ”Host port” and ”Guest port” values 443 Press OK
13. Select “Adapter 2” sheet and “Enable Network Adapter”
14. Select Attached to: “Host-only Adapter” Press OK
15. Select Machine Settings System Processor and select “Extended Features:
Enable PAE/NX” Press OK
16. Communication setup is now ready to use. Virtual machine can be started by
pressing VirtualBox manager main window start button: