
Technical data


Installing Disk and Tape Drives
7-14
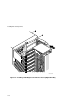
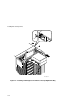
Hot-Swap Drive Bay
Hot-swapping allows you to remove or install a hot swap drive while the server
remains on-line and active but not accessing the device being swapped. This
eliminates interference with the server’s operation. For hot swap drives, you can use
the “hot swapping” method to replace a drive providing that the device is not active
(green activity LED is off).
NOTE:
You might need to reconfigure your server to
recognize the devices you installed.
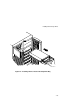
Use the following procedure to install or replace a hot swap drive:
1. Unlock and open the right front door.
2. Grasp the filler panel or drive by pressing in and holding the handle in the
middle of the extractor tool (see Figure 7-5).
3. Using the extractor tool, pull the drive or filler panel out.
4. Insert the new drive into the guide slots and push it in until it is fully seated
and the mounting tabs engage the shelf.
5. Close and lock the door.