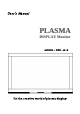
User’s Manual LASMA P PLASMA D ISPL AY M o n it o r PL DISP LAY Monitor MODEL : DPD-4210 It’s the creative world of plasma display
WARNING RISK OF ELECTRICAL SHOCK, DO NOT OPEN CAUTION : TO REDUCE THE RISK OF ELECTRICAL SHOCK, DO NOT REMOVE COVER(OR BACK). NO USER SERVICEABLE PARTS INSIDE. REFER SERVICING TO QUALIFIED SERVICE PERSONNEL. The lightning flash with the arrowhead symbol, within an equilateral triangle, is intended to alert the user to the presence of uninsulated "dangerous voltage" within the product's enclosure that may be of sufficient magnitude to constitute an electric shock to persons.
Features and Package Features - 42" Diagonal Viewing Area - Menu driven On Screen Display (OSD) for Brightness and Contrast, Sharpness, Hue and Saturation , NTSC/PAL, PIP(Picture in Picture), Aspect Ratio, Input Source, Audio, Audio Adjust, Language, Color Temperature - IR Remote control for all functions - Built-in Television Tuner - Zoom Feature (up to 500%) - Freeze Picture Feature - Rotate Picture Feature - Headphone output (only sub sound) - Speaker output : Left, Right, Center, Surround-L, Surround-R,
I/O Definitions Front Panel Controls - Main Power ON/OFF - Power ON/OFF - Volume UP - Volume DOWN - AV Rear Unit I/O's - AC Power Input - Monitor Composite Video Output - Monitor Line Level Audio Output - S-VHS Input - Composite Video Input (2) - Line Level Audio Input (2) - SCART Input/Output - DVD Component Video Input - DVD Line Level Audio Input - PC D-sub Connector Input - PC Headphone Audio Input - Headphone Audio Output - Speaker Output : Left, Right, Center, Surround-L, Surround-R, Sub-woofer -4-
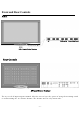
Front and Rear Controls Front AV Vol Down/Up Power /Main Power LED / Remote Control Receiver Rear Controls AV Input/Output Terminal The recessed AV input/output terminals allow the user to have the option of using the mounting stand or wall mounting the 42" Plasma Monitor. The Monitor itself is only 95mm wide.
Basic Operation PC 1. Connect as the shown drawing. 2. Power on. 3. Press the [PC] button. External Speaker & Headphone Connection 1. Power Off. 2. Connect as the shown drawing. 3. Power on. 4. Adjusting Audio setting. Headphone outputs Sub-Signal Sounds.
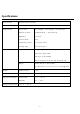
Specifications Power Source AC100V~240V, 50/60㎐ Power Consumption < 350W (Typical) Display Panel Screen Size 921 mm (H) × 518 mm (V) Number of Pixels 853(Horizontal) × 480 (Vertical) Brightness 550 cd/m2 Contrast Ratio 700:1 Displayable Colors 16,770,000 Colors Viewing Angle Over 160 degrees Input PC (P), PC(S) Input/Output <42" diagonal> Video1(V, L, R)/S-VHS Video2 (V, L, R)/SCART Video3 [Component (Y, Pb, Pr), Sound (L, R)] Output Monitor Out (V, L, R)/ SCART Speaker Out (L,R,Cente
Troubleshooting Symptom No Power Cause Possible Solution Power to the Monitor is not Check source of power to the Monitor. plugged in. Unit will not respond to Sensor is blocked. Clear path for sensors. remote control Batteries in remote control Clean sensor lens. are weak. Replace batteries. Video source incorrect. Check video source connection. No signal is displayed Make sure Monitor is set to correct video source.
FCC Compliance Statements NOTE : This equipment has been tested and found to comply with the limits for a Class B digital device, pursuant to part 15 of the FCC Rules. These limits are designed to provide reasonable protection against harmful interference in a residential installation. This equipment generates ,uses and can radiate radio frequency energy and ,if not installed and used in accordance with the instruction , may cause harmful interference to radio communication.