
User manual

7
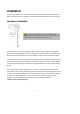
To install in Ethernet
Make sure the Ethernet is firmly connected to a switch hub. After attaching the Ethernet cable plug
in the power adapter. If the LED turns out to be steady blue, go to next paragraph “Software
installation”. If the Ethernet is not available, Network Camera will switch to wireless LAN mode.
To install in wireless LAN
If the Ethernet is not available while power on, the Network Camera will search for any access
point with the SSID “default”. Once any access point is found, the LED will turn blue to wait for
installation. If the network environment cannot meet the default settings, install Network Camera
in Ethernet to proceed with wireless LAN configuration.
Software installation
At the end of the hardware installation, users can use Installation Wizard program included in the
product CDROM to find the location of the Network Camera. There may be many Network
Cameras in the local network. Users can differentiate the Network Cameras with the MAC
address. The MAC address is printed on the labels at the back of the Network Camera body.
Once installation is complete, the Administrator should proceed to the next section "Initial
access to the Network Camera" for necessary checks and configurations.