
User's Manual


DIGITAL CONTROL INCORPORATED
8 DigiTrak Falcon
F2
Operator’s Manual
Jobsite Setup
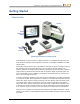
Getting started with Falcon is easy: run the Frequency Optimizer, choose a band, pair the
receiver with the transmitter, calibrate, check range, and check for active interference. These
tasks are described in detail starting with Receiver Menus on page 13.
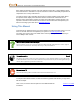
Using the trigger Page 10
Click the trigger to move between menu options. Hold briefly and release to make a selection. Do
nothing in a menu for five seconds to return to the Locate screen.
Run Frequency Optimizer
1. With the transmitter off (batteries not installed), take the Falcon receiver to the point
along the intended bore that might create the biggest locating challenge, such as being
the deepest point of the bore or an area with obvious active interference such as power
lines, railway crossings, traffic lights, or transformers.
2. Power on the receiver and select Frequency Optimizer (FO)
from the Main menu.
Frequency Optimizer
Page 14
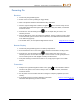
3. With the FO results active, walk the entire intended bore path with the receiver and flag
areas of high background noise (active interference). The higher a frequency band's bar
is on the graph, the greater the interference. Note which band remains consistently low,
since the band with the lowest level of interference will likely be the one you want to use.
-90 to -72 dB Low interference levels
-72 to -54 dB Moderate interference
-54 to -18 dB Interference will become an issue as depth increases
Repeat the above steps as necessary to help determine the lowest-noise frequency band to
use.
Choose a Band
1. Insert batteries in the transmitter, positive end first.
2. On the receiver, click to move the selector on the bottom of the Frequency Optimizer
graph to the band you want to use and hold briefly to select.
3. Assign as the Up or Down band.
4. Optional: select and assign a second frequency band.
5. Select Pair .
6. Align the receiver and transmitter IR windows within two inches of each other
and select the check mark to pair. A successful pairing is indicated by a beep
and a check mark.