
User's Manual


DIGITAL CONTROL INCORPORATED
DigiTrak Falcon
F2
Operator’s Manual 7
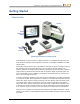
Powering On
Receiver
1. Install a fully charged battery pack.
2. Power on the receiver by holding the trigger briefly.
3. Click to accept the “Read the manual before using” statement.
4. Note the regional designation number in the globe on the receiver startup screen.
This number must match the region of the transmitter. If they don’t match, contact DCI
Customer Service.
5. First time use: from the Settings menu , set the depth units, pitch units, and
telemetry channel.
6. From the Main menu, select the Frequency Optimizer, choose a frequency band, power
on the transmitter, pair the receiver to the transmitter, and calibrate with the transmitter
in the drill head (page 20).
7. On the Main menu, set the optional Height-Above-Ground.
Height-Above-Ground (HAG)
Page 18
Remote Display
1. Install a fully charged battery pack in the battery compartment.
2. Press the button to turn on the remote, which defaults to the Remote Locating screen.
3. First time use: from the Settings menu , set the depth units, pitch units, and
telemetry channel. Use the same settings as on the receiver. It is also good practice to
use the same system of units (English or metric) on both devices.
4. Verify data is being received from receiver. If not, verify proper region is set on both
devices.
Transmitter
1. Compare the regional designation number in the globe on the transmitter with the
number in the globe on the receiver startup screen. If they don’t match, contact DCI
Customer Service.
2. Do not power on the transmitter until after running the Frequency Optimizer (see next
section).
3. If you will be using the Frequency Optimizer, transmitter
orientation while powering on does not matter.
Batteries and Power On/Off
Page 57