
User's Manual


DIGITAL CONTROL INCORPORATED
28 DigiTrak Falcon
™
F5
Operator’s Manual
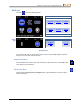
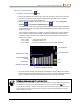
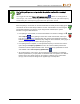
5. Toggle to the band you want to use and click to select. Typically this will be a band with a
low interference level that did not experience high maximum noise readings along the
bore path.
Band Number
7
11
16
20
25
29
34
38
43
Range in kHz
4.5–9.0
9.0–13.5
13.5–18
18–22.5
22.5–27
27–31.5
31.5–36
36–40.5
40.5–45
6. Select whether to assign this as the Up or Down band (the band the Tx powers on with
when facing Up or Down).
Up Down
Note If the band number you want to use is already displayed at the right edge
of the screen and marked in red on the bottom of the graph, select it
anyway. The band you select now will be optimized with different
frequencies than the last time that band was used.
7. Optional: toggle to select a second band, then assign as the opposite (Up or Down) band;
changing both bands is not required.
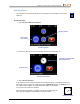
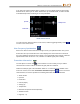
8. Select Pair , then Transmitter Pairing Request . If you assigned two new
bands, both will pair at the same time.
9. The receiver displays the transmitter pairing screen. Insert batteries in the
transmitter, install the battery cap, and wait 15 seconds for the transmitter to
fully power on.
Transmitter
Page 64
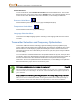
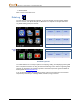
10. Hold the recessed infrared (IR) port of the transmitter within 2 in. of and facing the IR
window on the front of the receiver.
11. Select again (we really like this icon) to pair the transmitter frequency band(s) to the
receiver.
Hold the transmitter in place for up to ten seconds for pairing. A blue circling icon
indicates the receiver and transmitter are not yet connected; check alignment and
proximity of the IR ports. Moving the transmitter during pairing may cause an error
code to display on the screen; if this happens, simply exit and restart the pairing process.
Transmitter IR port
Battery compartment
"Up"
"Down"