
User's Manual


DIGITAL CONTROL INCORPORATED
8 DigiTrak Falcon
™
F5
Operator’s Manual
Setup Summary
Getting started with a Falcon F5
receiver is easy: run the frequency optimizer, walk and
scan the bore path, pair the receiver with the transmitter, calibrate, check Above Ground
Range, and check for active interference. It's all summarized in the following several
paragraphs, with links to the details later in this manual. If you're hungry for the details now,
skip to Receiver on page 10.
Run the Frequency Optimizer
1. With the transmitter off (batteries not installed), take the receiver to the point along the
intended bore that might create the biggest locating challenge, like the deepest point of
the bore or where there is obvious active interference such as a railway crossing,
transformer, traffic lights, or power lines.
2. Power on the receiver and from the Main menu select Transmitter
Selection, then Frequency Optimizer (FO).
Transmitter
Selection
Page 26
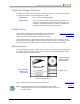
3. With the FO results active, walk the entire intended bore path with the receiver and note
areas of high background noise (active interference). The higher a frequency band's bar
is on the graph, the greater the interference. Note which band remains consistently low,
since the band with the lowest level of interference will likely be the one you want to use.
Assign Frequency Bands
1. On the receiver, toggle the selector on the bottom of the frequency optimizer graph to the
band you want to use and click to select.
2. Assign as the Up or Down band.
3. Optional: select and assign a second frequency band.
4. Select Pair .
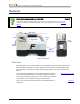
5. Insert batteries in the transmitter, positive end first, install the battery cap, and allow several
seconds for the transmitter to fully power on and begin sending data to the receiver.
6. Align the receiver and transmitter IR windows within two inches of each other. Select
to open the pairing menu, then again to pair.