
User's Manual
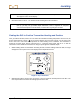
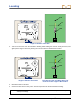
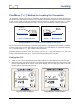
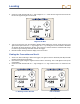
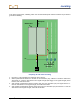
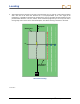

Table Of Contents
- Safety Precautions and Warnings
- Dear Customer:
- Introduction
- Receiver
- Transmitter
- Remote Display
- Battery Charger
- Locating Instructions
- Appendix A: System Specifications and Maintenance Requirements
- Appendix B: Projected Depth Versus Actual Depth and the Fore/Aft Offset
- Appendix C: Calculating Depth Based on Distance Between FLP and RLP
- LIMITED WARRANTY

Locating
NOTE: The arrow that appears below the depth measurement and that points to the transmitter
also appears on the remote display.
5. Mark this location as the LL. You should now be standing above the transmitter.
NOTE: If the transmitter pitch exceeds ±30% (or 17°) and/or the transmitter depth exceeds 15 ft
(4.5 m), you may not get reliable depth information. Refer to Appendix B: Projected
Versus Actual Depth and Fore/Aft Offset, for information regarding this situation.
Finding the RLP to Confirm Transmitter Heading and Position
Next, you will find the RLP, where you can confirm the transmitter heading and position. Like the FLP, the
RLP is represented as a target (
) on the receiver display. Once the RLP is found, you can connect the
RLP to the FLP to form a line that represents the exact heading of the transmitter. The transmitter is
located at the point where this line intersects the LL. Using the locate points and the LL to find the
transmitter is more reliable and efficient than using the peak signal or shallowest depth.
1. While standing above the transmitter still facing the drill, continue walking toward the drill; the target
will appear in the top left corner of the display and the depth will increase.
Target in Top Left Corner
2. Walk forward until the target moves into the box. You have found the fore/aft position of the RLP. The
next step describes how to find the left/right position of the RLP.
DigiTrak
®
LT2™ Operator’s Manual 51