
User's Manual

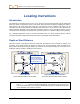
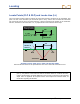
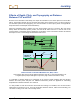
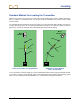
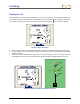
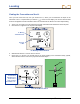
Table Of Contents
- Safety Precautions and Warnings
- Dear Customer:
- Introduction
- Receiver
- Transmitter
- Remote Display
- Battery Charger
- Locating Instructions
- Appendix A: System Specifications and Maintenance Requirements
- Appendix B: Projected Depth Versus Actual Depth and the Fore/Aft Offset
- Appendix C: Calculating Depth Based on Distance Between FLP and RLP
- LIMITED WARRANTY

Locating
Finding the Transmitter and the LL
Once you have found the FLP, then you will find the LL, where you can determine the depth of the
transmitter. The LL is represented by a short line (
) on the receiver display. The receiver must be held
level and in alignment with the transmitter when over the drill head to obtain an accurate depth reading.
1. At the FLP, turn again to face the drill head (and drill) and walk forward toward the last locate point.
2. Note that the LL appears in the top left of the display.
LL .Moving
Toward Receiver
Receiver
or Box
LL
Moving Toward the Box
3. Walk forward and the LL moves closer to the box.
4. Center the LL in the box. You should now see an arrow pointing to the transmitter battery symbol,
which indicates that the value is the projected transmitter depth.
Drill
LL
FLP
RLP
Arrow pointing
to transmitter
indicates line is
in box and re-
ceiver is above
transmitter or LL.
Line in the Box at the LL
50 DigiTrak
®
LT2™ Operator’s Manual