
User's Manual

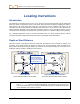
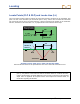
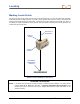
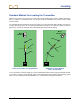
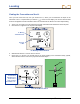
Table Of Contents
- Safety Precautions and Warnings
- Dear Customer:
- Introduction
- Receiver
- Transmitter
- Remote Display
- Battery Charger
- Locating Instructions
- Appendix A: System Specifications and Maintenance Requirements
- Appendix B: Projected Depth Versus Actual Depth and the Fore/Aft Offset
- Appendix C: Calculating Depth Based on Distance Between FLP and RLP
- LIMITED WARRANTY

DIGITAL CONTROL INCORPORATED
Locating Instructions
Introduction
The DigiTrak LT2 Locating System is easy to use, but there are basic principles that must be understood
before you begin to operate the system. This section gives important information regarding the depth or
slant distance; the locate points and locate line; the geometry of these elements with respect to the
transmitter; and the proper method for marking locate points once they are found. It then describes the
standard locating procedure and an alternate technique referred to as the plus/minus method. The last
section discusses tracking the transmitter when you cannot walk over it, which is called off-track locating.
For a detailed explanation of how to track the transmitter when it is steep and deep, please read the
information provided in Appendix B: Projected Versus Actual Depth and Fore/Aft Offset.
Depth or Slant Distance
When the receiver is held directly above the transmitter, the distance to the transmitter is referred to as
the depth. At any other location, the distance is referred to as the slant distance. When the depth is dis-
played, there will always be arrows pointing up and down from the depth reading. If the arrows are not
displayed, then the reading is actually the slant distance.
Arrow pointing to tool
head indicates the
line is in the box and
the receiver is above
the transmitter or LL.
Line in the Box Target Moving Toward the Box
Arrows indicate reading is actual depth. No arrows indicate reading is slant distance.
NOTE: If the transmitter is shallower than approximately 24 in. (61 cm) you will see four dashed
lines ( — — — — ) where the depth should display. This means that the receiver is too
close to the transmitter and it is getting saturated with signal (see “Height Above Ground”
menu discussion in the Receiver section).
DigiT
rak
®
LT2™ Operator’s Manual 43