
User's Manual

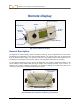
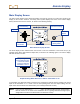
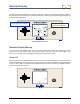
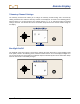


Table Of Contents
- Safety Precautions and Warnings
- Dear Customer:
- Introduction
- Receiver
- Transmitter
- Remote Display
- Battery Charger
- Locating Instructions
- Appendix A: System Specifications and Maintenance Requirements
- Appendix B: Projected Depth Versus Actual Depth and the Fore/Aft Offset
- Appendix C: Calculating Depth Based on Distance Between FLP and RLP
- LIMITED WARRANTY

Battery Charger
AC/DC Power Setup
Inserting Charger Plug into Power Port
To install either the AC adapter or the DC power cord,
insert the charger plug into the power port on the back
of the battery charger (see photo to right) and rotate a
quarter turn in either direction to lock it in place.
If using AC power, connect the AC power cord to the
power adapter, then plug the cord into the AC power
receptacle (wall outlet).
If using DC power, plug the DC power cord directly into
the DC power receptacle.
Your battery charger is now ready to use.
Charging a Battery
1. With power supplied to the battery charger, place a battery pack into the charger with the terminal
end making contact with the springs in the battery charger. The red light will illuminate, indicating that
the battery is charging. However, the battery may require discharging to remove any residual charge
and prolong the battery life; DCI recommends that you discharge a battery pack, as instructed in step
2, at least once a month.
Red Light:
– Solid
indicates unit
is charging.
– Blinking indicates
low-voltage battery
or power interrup-
tion.
Green Light:
– Solid
indicates
battery is fully
charged.
– Blinking
indicates
battery is being
discharged.
Discharge Button
Charge Button
Serial Numbe
r
Battery Ch
arger Control Panel
40 DigiTrak
®
LT2™ Operator’s Manual