
User's Manual

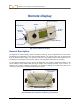
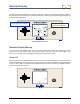
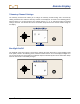
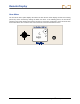


Table Of Contents
- Safety Precautions and Warnings
- Dear Customer:
- Introduction
- Receiver
- Transmitter
- Remote Display
- Battery Charger
- Locating Instructions
- Appendix A: System Specifications and Maintenance Requirements
- Appendix B: Projected Depth Versus Actual Depth and the Fore/Aft Offset
- Appendix C: Calculating Depth Based on Distance Between FLP and RLP
- LIMITED WARRANTY

Remote Display
The remote display has a main display screen and four menu options (power off, telemetry channel
settings, backlight on/off, and hour meter). The power on/off functions, including instructions for installing
the battery, the main display screen, and the remote display menu options are explained in this section.
Power On/Off
Installing the Battery Pack
1. Remove the battery compartment cover from the side of the remote display by rotating the thumb
screws counterclockwise.
2. Insert a fully charged battery pack terminal end first with exposed terminals aligned with springs in
battery compartment.
3. Replace the battery compartment cover and tighten the thumb screws by rotating them clockwise.
Turning On the Remote Display
The function button on the remote works similarly to the trigger on the receiver. To turn the LT2 remote
on, press or click the function button. You will hear a long tone followed by a set of numbers that
represent the firmware versions in the remote display.
Turning Off the Remote Display
To turn the remote off, you must first access the power off menu (see “Remote Display Menus”). Press or
click the function button to reach the power off menu, then hold the button in during the countdown from 3
to 0 to shut the remote off; you will hear a beep each time the counter decreases followed by three short
confirmation beeps before the unit shuts off.
Automatic Shutoff
The remote display will automatically shut itself off without an audible indicator if no data is received for
15 minutes.
34 DigiTrak
®
LT2™ Operator’s Manual