
User's Manual
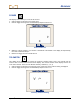
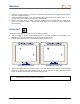
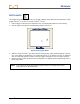
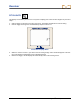
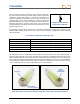
Table Of Contents
- Safety Precautions and Warnings
- Dear Customer:
- Introduction
- Receiver
- Transmitter
- Remote Display
- Battery Charger
- Locating Instructions
- Appendix A: System Specifications and Maintenance Requirements
- Appendix B: Projected Depth Versus Actual Depth and the Fore/Aft Offset
- Appendix C: Calculating Depth Based on Distance Between FLP and RLP
- LIMITED WARRANTY

Receiver
24 DigiTrak
®
LT2™ Operator’s Manual
Transmitter
Centerline
Transmitter
in Housing
10 ft (3.05 m)
LT2 Receiver
(top view)
Setup for 1-Point Calibration
2. Hold the trigger in on the receiver, and verify that roll and pitch readings are present and that the
signal strength is stable. Then, click the trigger to advance to the 1-point calibration screen.
3. Hold the trigger in while holding the receiver steady through the countdown/beep sequence from 5
to 0.
4. Release the trigger when the counter reaches 0. You will see a checkmark at the bottom of the
display accompanied by three confirmation beeps indicating a successful calibration. If you see a
checkmark with a slash through it (
) and hear a short beep followed by two long tones, then the
calibration has failed, and you must repeat steps 2 through 4. The error screen will display for ap-
proximately 30 seconds before returning to the locating screen.
5. After you have successfully calibrated the receiver, the display will automatically return to the locating
screen. You must now verify the calibration by checking depth readings at three locations.
6. To verify calibration, place the receiver on the ground parallel to and level with the transmitter so that
the distance from the centerline of the transmitter to the inside edge of the receiver measures a given
amount on the tape measure; in the example shown in the figure below, a distance of 6 ft (1.83 m) is
used.
Transmitter
Centerline
Transmitter
in Housing
6 ft (1.83 m)
LT2 Receiver
(top view)
Verifying Calibration
7. You should see a depth reading that matches this measured distance, which in our example would be
6 ft (1.83 m).*
8.
Repeat the above two steps in at least two more locations.
*Depth tolerance is 5%; thus, at a distance of 6 ft (1.83 m), the error tolerance is 3.6 in. (9 cm).