
User's Manual
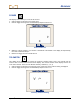
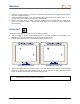
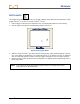
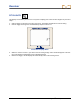
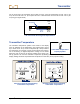
Table Of Contents
- Safety Precautions and Warnings
- Dear Customer:
- Introduction
- Receiver
- Transmitter
- Remote Display
- Battery Charger
- Locating Instructions
- Appendix A: System Specifications and Maintenance Requirements
- Appendix B: Projected Depth Versus Actual Depth and the Fore/Aft Offset
- Appendix C: Calculating Depth Based on Distance Between FLP and RLP
- LIMITED WARRANTY

Receiver
POWER
This display menu allows you to turn off the receiver.
1. Click the trigger to advance to the power menu.
2. Hold the trigger in through the countdown/beep sequence from 3 to 0.
Power Off Screen
3. When the counter reaches 0, you will see a checkmark at the bottom of the display accompanied by
four short confirmation beeps.
4. Release the trigger and the unit will shut off.
TELEMETRY
This display menu allows you to change the telemetry channel setting. This is the channel that the
receiver uses to communicate with the remote display. The receiver and the remote display must be set
to the same channel. There are four different telemetry channels (1, 2, 3, 4).
1. Click the trigger to advance to the telemetry menu, where the current channel setting is displayed.
2. Hold the trigger in through the countdown/beep sequence from 1 to 0.
Telemetry Channel Setting
DigiTrak
®
LT2™ Operator’s Manual 21