
User's Manual
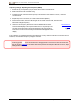
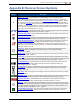
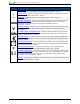

Table Of Contents
- Important Safety Instructions
- Getting Started
- Receiver
- Receiver Menus
- Locating Basics
- Advanced Locating
- Transmitter
- Appendix A: System Specifications
- Appendix B: Receiver Screen Symbols
- Appendix C: Projected Depth Versus Actual Depth and the Fore/Aft Offset
- Appendix D: Calculating Depth Based on Distance Between FLP and RLP
- Appendix E: Reference Tables

DIGITALCONTROLINCORPORATED
64 DigiTrak Falcon F5
®
Operator's Manual
Frequency Change, Repeating Roll Sequence (RRS3)
1. Remain at any clock position (CP) for at least 40 seconds to clear all timers.
2. Make a reference mark on the drill string.
3. Complete one full clockwise rotation (±2 CP) of the reference mark within 0.5–30 sec., then wait
10–20 seconds.
4. Repeat step 3 two more times, for a total of three rotations (RRS3).
5. After the third rotation, leave the drill string at rest for a total of 60 seconds, after which the
transmitter changes frequency.
6. Select the new frequency band in the receiver's Band Selection menu.
The new band displays at the top of the Main menu. It may take up to 30
seconds for the transmitter to begin sending data on the new frequency;
return to the Locate screen and verify that transmitter data appears on the
display.
Band Selection
Menu
Page 28
If any rotation is not completed within the prescribed time, or if any rotation continues for more than one full
revolution, the transmitter frequency change is canceled.
A warning symbol in the roll indicator after changing bands on the receiver means the transmitter
has not yet been calibrated in this band. While locate positions and roll/pitch data will be correct, depth
readings will be incorrect.