
User's Manual
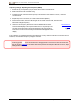
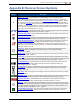
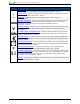

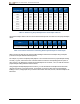
Table Of Contents
- Important Safety Instructions
- Getting Started
- Receiver
- Receiver Menus
- Locating Basics
- Advanced Locating
- Transmitter
- Appendix A: System Specifications
- Appendix B: Receiver Screen Symbols
- Appendix C: Projected Depth Versus Actual Depth and the Fore/Aft Offset
- Appendix D: Calculating Depth Based on Distance Between FLP and RLP
- Appendix E: Reference Tables

DIGITALCONTROLINCORPORATED
DigiTrak Falcon F5
®
Operator's Manual 63
Changing Frequency Bands
With the receiver at the Locate screen, hold toggle right to open the Band Selection
menu, where you can switch between the Up and Down frequency bands and
enable or disable fluid pressure monitoring.
Band Selection
Page 28
Use these procedures to switch between the two optimized frequency bands, such
as when performing an interference check (page 40), or an AGR test (page 17) in
both bands with the transmitter in the drill head prior to drilling.
Installing Batteries /
Power On
Page 59
Above Ground (Pre-Bore) Tilt Method
Do not roll the transmitter more than two clock positions (CP) during this procedure.
1. Place the transmitter on an approximately level surface (0±10°) for at least five seconds
with the receiver at the Locate screen and transmitter data being displayed.
2. Tilt the transmitter up at approximately 65° (over 100%, or nearly vertical).
3. Hold the transmitter steady for 10–18 seconds.
4. Return the transmitter to level within 10 seconds.
5. After 10–18 seconds, all transmitter data disappears from the receiver’s screen, indicating the
transmitter frequency has changed.
6. Select the new frequency band in the receiver's Band Selection menu.
The new band displays at the top of the Main menu. It may take up to 30
seconds for the transmitter to begin sending data on the new frequency;
return to the Locate screen and verify that transmitter data appears on the
display.
Band Selection
Menu
Page 28
Below Ground (Mid-Bore) Roll Methods
Switching between bands on the Falcon F5 transmitter may provide better data results while drilling in a
section of the bore with a high level of interference. Use these methods to switch between transmitter
frequency bands mid-bore. Practice these roll methods before sending the drill head below ground.
Frequency Change, 10-2-7
1. Ensure roll offset is disabled and transmitter roll data is displayed on the
receiver.
Roll Offset Menu
Page 22
2. Position the transmitter at 10:00 (±1 clock position, or CP) for 10–18 seconds.
3. Roll the transmitter clockwise to its 2:00 position (±1 CP) within 10 seconds and remain there for
10–18 seconds.
4. Roll the transmitter clockwise to its 7:00 position (±1 CP) within 10 seconds.
5. When transmitter data disappears from the receiver, the transmitter frequency has changed. This
will take approximately 10–18 seconds.
6. Select the new frequency band in the receiver's Band Selection menu.
The new band displays at the top of the Main menu. It may take up to 30
seconds for the transmitter to begin sending data on the new frequency;
return to the Locate screen and verify that transmitter data appears on the
display.
Band Selection
Menu
Page 28
7. Re-enable roll offset, if applicable.