
User's Manual
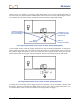
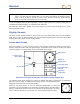
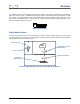
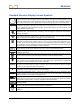

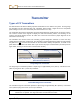

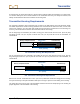
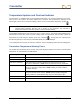
Table Of Contents
- Safety Precautions and Warnings
- Dear Customer:
- Introduction
- Receiver
- Transmitter
- Remote Display
- Battery Charger
- Locating
- The Target Steering Function
- Appendix A: System Specifications and Maintenance Requirements
- Appendix B: Projected Depth Versus Actual Depth and the Fore/Aft Offset
- Appendix C: Calculating Depth Based on Distance Between FLP and RLP
- Appendix D: Reference Tables
- LIMITED WARRANTY

Receiver
DigiTrak
®
F2
®
Operator’s Manual 31
Hold the trigger in to advance to the screen shown below where you can set the target depth value. At
this screen, you can click through the available fields, which are the foot or meter (ft/m) setting, the inches
or centimeters (in./cm) setting, and the checkmark (used to confirm the target depth setting).
Set Target Depth Value Screen (Foot or Meter Setting Highlighted)
In this example, the line under the number 2 indicates that the ft/m setting is highlighted. To change this
setting, hold in the trigger until a box appears around the number 2, as shown below. Once you see the
box, click the trigger to increase (in 1-ft or 1-m increments) to the desired number. Once you reach the
desired number, hold in the trigger, and the box will turn back into an underline under the ft/m setting.
Set Target Depth Value Screen (Foot or Meter Setting Selected)
To change the in./cm setting, click the trigger to move the underline to the in./cm position, and then hold
the trigger in until a box surrounds the number. Once you see the box, click the trigger to increase in 1-in.
or 2-cm increments. Once you have the desired in./cm setting, hold in the trigger.
Underline indicates
value is highlighted
and can be changed.
Checkmark is used
to confirm the target
depth setting.
Foot or
Meter Setting
Inches or
Centimeters Setting