
User's Manual
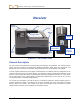
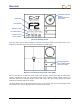
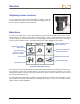
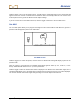
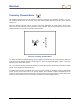
Table Of Contents
- Safety Precautions and Warnings
- Dear Customer:
- Introduction
- Receiver
- Transmitter
- Remote Display
- Battery Charger
- Locating
- The Target Steering Function
- Appendix A: System Specifications and Maintenance Requirements
- Appendix B: Projected Depth Versus Actual Depth and the Fore/Aft Offset
- Appendix C: Calculating Depth Based on Distance Between FLP and RLP
- LIMITED WARRANTY

Receiver
16 DigiTrak
®
F2™ Operator’s Manual
Adjusting Screen Contrast
You can adjust the screen contrast by holding the trigger in with the
receiver held vertical and in locate mode. Release the trigger when the
screen contrast is adjusted to the desired level.
Main Menu
The main menu allows you to set the desired depth units, pitch units, and height-above-ground; to select
telemetry options; to calibrate the receiver to the transmitter; to use the Target Steering function; and to
turn off the receiver. To access the main menu, click the trigger from the locate mode screen. You will see
six menu options, with the first one, the height-above-ground option, highlighted for selection.
Receiver Main Menu Screen
The main menu screen also displays the receiver battery status and the current telemetry channel selec-
tion (channel 2 is shown in the example above). If the main menu is accessed by accident, you can click
through all the options to return to the locate mode screen or wait 5 seconds for the menu to time out and
return to the locate mode screen.
The table below shows the options available on the main menu and provides a brief description of each.
These options are described more fully in the following discussion. To access a menu option, hold the
trigger in with the option highlighted.
Receiver Battery Status
(Shown 80% Full)
Telemetry Channel Menu
(Channel 2 Selected)
Depth/Pitch Units Menu
Target Steering Menu
Height-Above-Ground
(HAG) Menu
Power Off
Calibration Menu
Box around item
indicates it is high-
lighted for selection.