
User's Manual


DIGITAL CONTROL INCORPORATED
DigiTrak F5 Operator’s Manual 3
Getting Started
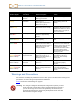
This section details the basic steps required to set up the F5 locating system and prepare for
locating. These steps include:
Power on the receiver, remote display, and transmitter (next section)
Conduct interference check (page 4)
Calibrate receiver to transmitter and/or verify calibration (page 6)
Set roll offset, if required (page 11)
Set height-above-ground (HAG) distance (page 13)
Additional steps are required when using the drill DataLog or pressure-tension DataLog
function (Log-While-Drilling, LWD), the F5 TensiTrak system pullback and pressure
monitoring system, or a cable transmitter. Manuals for LWD, TensiTrak, and the Multi-
Function Cable Box (MFCB) used with cable transmitters are available on our website.
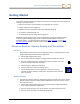
Power on Receiver, Remote Display, and Transmitter
Receiver
1. Before loading a battery pack, note the telemetry frequency designations listed on the
serial number label inside the battery compartment.
2. Install a fully charged battery pack.
3. Turn on the receiver by holding in the trigger switch for about two seconds.
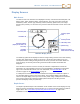
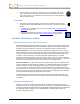
4. Note the regional designation number on the receiver startup screen. This
number must match that of the transmitter.
5. Click the trigger to display the main menu.
6. From the main menu, select the Settings menu.
7. Use the Settings menu to set the depth units, pitch units, time and
calendar, telemetry channel, pressure units, temperature units, and force
units, as needed.
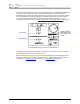
Remote Display
1. Compare the telemetry frequency designations listed on the back of the remote display
with the numbers from the receiver’s serial number label. If they don’t match, contact
DCI Customer Service.
2. Install a fully charged battery pack or connect the DC power cable and install the
brace insert in the battery compartment.
3. Press the execute button to turn on the remote. You will see the main screen.
4. Press the down arrow button to display the main menu.