
User's Manual
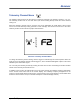
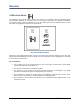
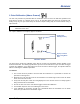

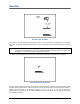
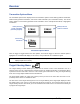
Table Of Contents
- This device complies with Part 15 of the Rules of the FCC. Operation is subject to the following two conditions: (1) this device may not cause harmful interference, and (2) this device must accept any interference received, including interference tha...
- Safety Precautions and Warnings
- Dear Customer:
- Introduction
- Receiver
- Transmitter
- Remote Display
- Battery Charger
- Locating
- The Target Steering Function
- Appendix A: System Specifications and Maintenance Requirements
- Appendix B: Projected Depth Versus Actual Depth and the Fore/Aft Offset
- Appendix C: Calculating Depth Based on Distance Between FLP and RLP
- Appendix D: Reference Tables
- Appendix E: EU Required Documentation
- LIMITED WARRANTY

Receiver
DigiTrak
®
F2
®
Operator’s Manual 21
Telemetry Channel Menu
The telemetry channel menu has five options: no telemetry (channel 0) or telemetry channel 1, 2, 3, or 4.
The telemetry channel icon on the main menu (and in the heading above) shows the current channel
setting of 2.
When the telemetry channel menu is accessed, the screen will display as shown below, with an arrow
next to the current telemetry setting (channel 2 in this example). The receiver must be set to the same
telemetry channel as the remote for proper communication.
Receiver Telemetry Channel Menu
To change the telemetry channel setting, click the trigger to scroll through the channel options. When the
arrow is next to the desired channel, hold the trigger in, and a checkmark will appear in place of the arrow
followed by the confirmation signal.
You can verify the telemetry channel by entering the main menu screen and viewing the channel number
shown on the telemetry channel menu icon.
In addition to the receiver and remote being set to the same channel, the telemetry frequency designation
for the receiver must match that for the remote display. The telemetry frequency designation on the
receiver’s serial number label must match one of those listed on the remote display’s serial number label
located on the back of the unit (see “General Description” in Remote Display section).