
User Manual
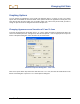
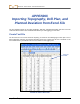
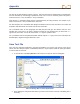
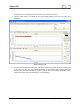
Table Of Contents
- Operator’s Manual
- Digital
- Control
- Incorporated
- Safety Precautions and Warnings
- Introduction
- System Components
- Startup and Operating Instructions
- SST Operating Procedure
- Setting Up SST Laptop
- Setting Up Equipment and Site
- 2. Establish Borepath Reference Line and Mark Borepath
- 3. Assemble and Torque-up Non-Magnetic Housing to Non-Mag Tool
- 4. Align Drill to Marked Borepath
- 5. Position & Align Non-mag Tooling Assembly onto Marked Borepath
- 6. Stage SST Equipment and Power Sources Adjacent to Tooling Assembly
- 7. Power Up Eclipse SST Equipment
- 8. Measure SST Transmitter Current Draw
- 9. Install SST Transmitter into Aligned Non-mag Tooling Assembly
- Setting Reference Heading (Ref Yaw) and Roll Offset
- Calibrating SST Tool and Confirming Proper System Operation
- Logging Drill Run
- Summary of Basic Operating Procedure
- SST Operating Procedure
- Computer Software Instructions
- Inputting and Changing Drill Data
- APPENDIXImporting Topography, Drill Plan, and Planned Deviation from Excel File
- LIMITED WARRANTY

Appendix
The first row of data will always consist of zeroes. This is because the first logged point is recorded when
the SST transmitter (in the housing) is positioned so that it is ½ in and ½ out of the ground. This point is
measured as zero, or 0.0, for both the x- and y-coordinates.
Note that the x,y coordinate values must be in decimal format (not using fractions). For example, if you
want to enter 4 ft 8 in., then you will enter the value 4.67.
For each data plot, the x-coordinate value will give the distance from the start of the bore. The x-value will
be positive and will continue to increase from the start of the bore.
The y-coordinate value for the topography and drill plan plots will give the distance from the zero
elevation line or the x-axis. If the value is negative or below the zero elevation line, you must enter a “–”
sign in front of the value. You do not need to enter a “+” sign for a positive value.
The y-coordinate value for the planned deviation will also require a “–” sign in front of the value when the
Deviation plot is negative and goes below the x-axis.
Save Text File
Once you have input the information in the Excel spreadsheet, you need to save the file in the correct
format. The SST software requires a tab-delimited text file (*.txt) for import. Follow the steps given below
to save the data as a text file.
1. To save the file, select File | Save As on the menu bar to open the Save As dialog box.
Folder Where File
Will Be Saved
Type in
File Name
Select File Type
Save As Dialog Box in Excel Application
2. In this dialog box, change the folder where you want to save the file at the top of the dialog box, if
necessary.
58 Eclipse
®
SST
®
Operator’s Manual