
User Manual
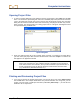
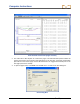
Table Of Contents
- Operator’s Manual
- Digital
- Control
- Incorporated
- Safety Precautions and Warnings
- Introduction
- System Components
- Startup and Operating Instructions
- SST Operating Procedure
- Setting Up SST Laptop
- Setting Up Equipment and Site
- 2. Establish Borepath Reference Line and Mark Borepath
- 3. Assemble and Torque-up Non-Magnetic Housing to Non-Mag Tool
- 4. Align Drill to Marked Borepath
- 5. Position & Align Non-mag Tooling Assembly onto Marked Borepath
- 6. Stage SST Equipment and Power Sources Adjacent to Tooling Assembly
- 7. Power Up Eclipse SST Equipment
- 8. Measure SST Transmitter Current Draw
- 9. Install SST Transmitter into Aligned Non-mag Tooling Assembly
- Setting Reference Heading (Ref Yaw) and Roll Offset
- Calibrating SST Tool and Confirming Proper System Operation
- Logging Drill Run
- Summary of Basic Operating Procedure
- SST Operating Procedure
- Computer Software Instructions
- Inputting and Changing Drill Data
- APPENDIXImporting Topography, Drill Plan, and Planned Deviation from Excel File
- LIMITED WARRANTY
Computer Instructions
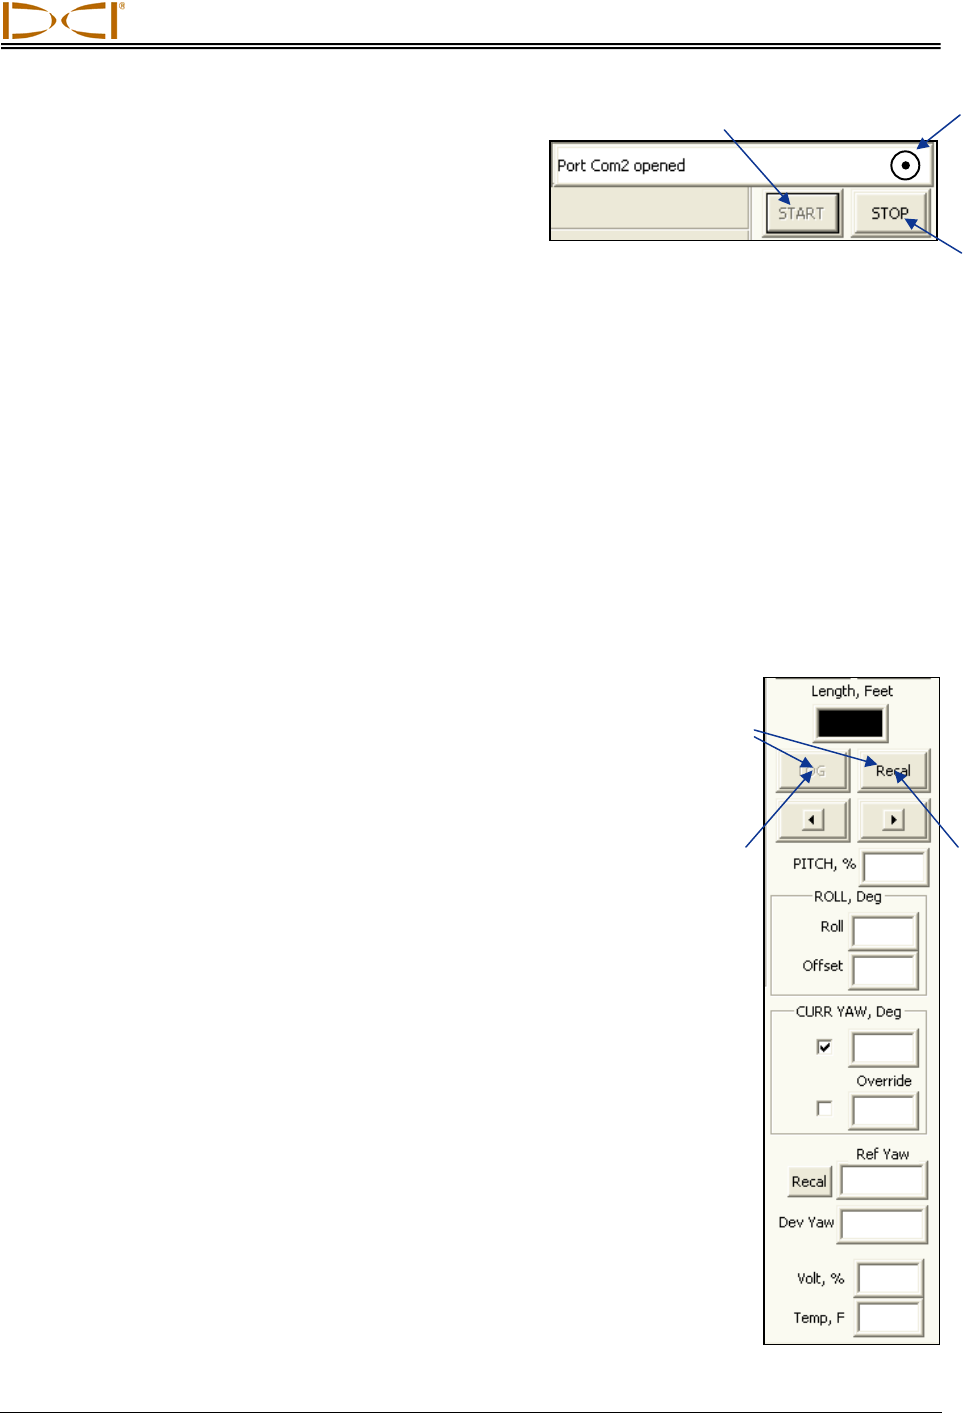
COM Port Status Window
and START/STOP Buttons
The COM Port Status Window indicates whether a COM
(serial) port is open and connecting the computer to the
SST transmitter through the remote display. The Status Ball on the right flashes when the computer is
receiving data from the SST transmitter. The START and STOP buttons are used for opening and closing
a port.
Open
Port
Status
Ball
Close
Port
A COM port must be open before bore data can be logged. To open a COM port, select Port from the
menu bar, and then select one of the four options (1, 2, 3, or 4). COM port 1 is typically selected. Click on
the START button, and, if the SST transmitter is connected and functioning, you will see the status ball
begin to flash and a message showing that a COM port is open. To disconnect from a port, click on the
STOP button.
To determine the computer’s available ports, open your computer’s Control Panel and click on the
System icon to open the System Properties dialog box. Click on the Hardware tab and then the Device
Manager option at the top to open the Device Manager dialog box. Click on “Ports” in the listing to view
the available ports on your system. You can select each port individually to see if it will open and function.
The open port will only function when live data is being received from the SST transmitter.
If you cannot open a port after you have identified one using your computer’s system properties hardware
settings in the Control Panel, close the Eclipse Steering Tool program
and reopen it. Select the desired port, and click on the START button. If
this does not solve the problem, then call DCI Customer Service, for
assistance.
Retreat
Pullback
Buttons
Live Data
This area of the application window displays live data from the SST
transmitter when it is powered up and the computer is connected to the
remote display. The types of information displayed are described below,
starting at the top of the data area.
A
dvance
¾ Length, Feet – An input box for the distance between logged
points (with units shown based on options selected in the Job In-
formation field). This distance must be typed in before you can
log data. The length is typically the length of one drill rod. It may
be advisable to record data at shorter intervals, particularly if con-
siderable pitch changes occur. This field will default to the most
recent length entered, so be sure to correct the value in this box if
you have changed the distance between log points. You can
change the length setting at any time by simply clicking the cursor
in this box and then typing in the desired length.
¾ LOG Button – Used to log data. This button can only be activa-
ted when a COM port is open and the computer is receiving data
from the SST transmitter. To log data, press the LOG button—the
new data will appear in the Logged Data field, and the Profile and
Deviation plots will automatically update. Always verify accuracy
of Live Data prior to logging. Be sure to orient the tool to 0° and
wait 10 seconds to ensure stable, accurate data.
Eclipse
®
SST
®
Operator’s Manual 41