
User Manual
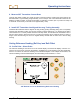
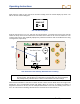
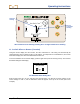
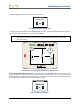
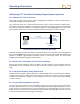
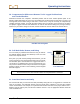
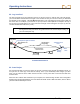
Table Of Contents
- Operator’s Manual
- Digital
- Control
- Incorporated
- Safety Precautions and Warnings
- Introduction
- System Components
- Startup and Operating Instructions
- SST Operating Procedure
- Setting Up SST Laptop
- Setting Up Equipment and Site
- 2. Establish Borepath Reference Line and Mark Borepath
- 3. Assemble and Torque-up Non-Magnetic Housing to Non-Mag Tool
- 4. Align Drill to Marked Borepath
- 5. Position & Align Non-mag Tooling Assembly onto Marked Borepath
- 6. Stage SST Equipment and Power Sources Adjacent to Tooling Assembly
- 7. Power Up Eclipse SST Equipment
- 8. Measure SST Transmitter Current Draw
- 9. Install SST Transmitter into Aligned Non-mag Tooling Assembly
- Setting Reference Heading (Ref Yaw) and Roll Offset
- Calibrating SST Tool and Confirming Proper System Operation
- Logging Drill Run
- Summary of Basic Operating Procedure
- SST Operating Procedure
- Computer Software Instructions
- Inputting and Changing Drill Data
- APPENDIXImporting Topography, Drill Plan, and Planned Deviation from Excel File
- LIMITED WARRANTY

Operating Instructions
19. Compensate for Differences Between Tool’s Logged Position Data
and Tracked Position
Differences between the computer’s calculated position and the tool’s tracked position (DEV in the
laptop’s Logged Data field) can occur if the first reading was not taken when the SST was ½ in and ½ out
of the ground, such as when using a mud motor. In such cases, it may be necessary to compensate by
changing the pitch reading. To modify the pitch reading, place your mouse on the specific row of data in
the laptop’s Logged Data field and double-click to view the Rod Record dialog box (see figure below).
Note that, if you make a change to the data, the Rod number for that row will have an asterisk after it.
Rod Record Dialog Box
20. Pull Back Rods, Resteer, and Relog
Pullback Buttons in
Live Data Area
A
dvance
Retreat
If it is necessary to pull back and resteer the tool, you will use
the pullback buttons (Retreat and Advance) in the Live Data
area on the computer screen.
Every time you push the left-pointing Retreat button, you will
remove the data for the last logged data point from the Profile
and Deviation plots and also from the Logged Data field. If
you decide to not pullback after you have retreated rods, you
can press the advance button until you are back to the original
position or where you want to start resteering, and the original
data will reappear.
NOTE: Be careful to be methodical when pulling back and advancing rods so that you do not hit
the retreat button more times than the number of rods pulled back or advanced.
21. Save Bore Data Occasionally
DCI recommends that you save the bore data periodically during the bore. A suggestion is to include the
name of the project, the horizontal distance from the launch point (x-distance), and the SST software
version in the filename. For example, for a job where Pole Road is the name of the project, 880 ft is the x-
distance from the launch point, and the SST software version is 2.9, an appropriate filename would be
“Pole Road 880 v2.9”.
Eclipse
®
SST
®
Operator’s Manual 29