
User's Manual
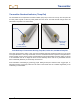

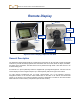
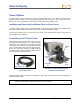
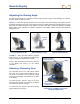
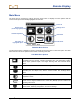
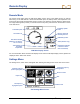

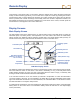
Table Of Contents
- Safety Precautions and Warnings
- Dear Customer:
- Introduction
- Receiver
- General Description
- Toggle and Trigger Switches
- Audible Tones
- Installing and Removing the Battery Pack
- Power On
- Power Off
- Main Menu
- Locate Mode
- Calibration Menu
- Height-Above-Ground (HAG) Menu
- Settings Menu
- Transmitter Selection Menu
- Drill DataLog Menu
- Pressure-Tension DataLog Menu
- Using the Keypad
- Display Screens
- Standard Receiver Display Screen Symbols
- Transmitter
- Remote Display
- Battery Charger
- System Setup
- Locating
- The Target Steering Function
- Appendix A: System Specifications and Maintenance Requirements
- Appendix B: Projected Depth Versus Actual Depth and the Fore/Aft Offset
- Appendix C: Calculating Depth Based on Distance Between FLP and RLP
- Appendix D: Reference Tables
- LIMITED WARRANTY

Remote Display
46 DigiTrak
®
F5™ Operator’s Manual
Adjusting the Viewing Angle
The FSD remote allows you to adjust the viewing angle through a range of 180° left/right, 90° up/down,
and 270° about the display’s center.
Up/Down – Loosen and squeeze the two knobs on the back of the remote display, then adjust the screen
as desired and tighten the knobs. If the knobs are loose, the display will hold its vertical position only until
the knobs are squeezed together or the display is vibrated. Thus, DCI recommends tightening the knobs
before drilling. Note: Adjusting the up/down orientation of the display without loosening the knobs can
damage the unit.
Loosen Display Knobs
Adjust Viewing Angle
Tighten Display Knobs
Left/Right – When the FSD remote’s magnetic
base is secure, you can adjust the left-right viewing
angle by rotating the display about the base.
Center – With the magnetic base secure, take hold
of the display and rotate it to the desired
orientation.
Attaching / Removing Visor
The removable visor on the FSD remote shields
the screen from environmental conditions such as
rain and sun. The visor is held in place by a ridge
on the top of the display and channels on the sides
of the display.
To install the visor, slide the pegs on the visor
along the peg channels on the sides of the display
until the visor locks over the ridge.
To remove the visor, push the visor back over the
ridge and along the channels.
Squeeze
knobs
Rotating for Left/Right and Center
Viewing Adjustments
Ridge
Peg channel
Rotation for
left/right viewing
adjustment
Rotation for center
viewing adjustment