
User's Manual
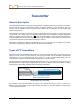
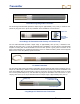
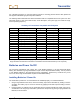
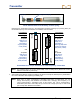
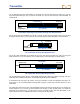
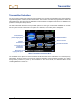
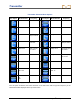
Table Of Contents
- Safety Precautions and Warnings
- Dear Customer:
- Introduction
- Receiver
- General Description
- Toggle and Trigger Switches
- Audible Tones
- Installing and Removing the Battery Pack
- Power On
- Power Off
- Main Menu
- Locate Mode
- Calibration Menu
- Height-Above-Ground (HAG) Menu
- Settings Menu
- Transmitter Selection Menu
- Drill DataLog Menu
- Pressure-Tension DataLog Menu
- Using the Keypad
- Display Screens
- Standard Receiver Display Screen Symbols
- Transmitter
- Remote Display
- Battery Charger
- System Setup
- Locating
- The Target Steering Function
- Appendix A: System Specifications and Maintenance Requirements
- Appendix B: Projected Depth Versus Actual Depth and the Fore/Aft Offset
- Appendix C: Calculating Depth Based on Distance Between FLP and RLP
- Appendix D: Reference Tables
- LIMITED WARRANTY

Transmitter
DigiTrak
®
F5™ Operator’s Manual 39
If a new transmitter option is selected, calibration will be required. Calibration is not required, however,
when switching between transmitters that were previously calibrated. Calibration is required every time a
new transmitter, receiver, or different housing is used.
NOTE: When using a “12/1.3” dual-frequency transmitter (5XD 12/1.3 or F5Dp 12/1.3), you only need
to calibrate under one of the dual options, DH or DL, for both dual frequencies, 12 kHz and
1.3 kHz, to be calibrated. Verify the depth reading at two distances in both frequencies before
drilling. If using single high (SH) mode, you must calibrate separately.
Changing the Frequency of
a “19/12” Dual-Frequency Transmitter
The “19/12” dual-frequency transmitters (5XD 19/12 and F5Dp 19/12) can be used at either frequency
(19.2 kHz or 12 kHz). After the transmitter has been powered on, the frequency setting of the transmitter
can be changed in two ways. One method is conducted with the transmitter above ground and is called
the pitch method. The other is conducted with the transmitter installed in the drill head and below ground
and is called the roll method. Instructions for both methods are provided below.
Pitch Method
1. Place the transmitter on an approximately level surface (±6.75° or ±15%) and ensure that the receiver
is in locate mode and transmitter data is being displayed.
2. Tilt the transmitter up so that it has a pitch value of greater than 50° (over 100% or nearly vertical).
3. Once the receiver displays the new pitch value of greater than 50° or 100%, then carefully roll the
transmitter at least one clock position while holding it at the tilted angle.
4. Once the change in roll is displayed on the receiver, then count for between 10–18 seconds while
holding the transmitter steady.
5. Without rolling the transmitter, slowly return it to the level surface.
6. Watch the receiver display to observe when all transmitter data disappears, which indicates that the
transmitter frequency has changed (this will take approximately 10–18 seconds).
7. Go to the transmitter selection menu and select the new frequency, which will then display at the top
of the menu screen. Open the locate mode screen to verify that transmitter data appears on the
display.
Roll Method
1. Ensure that the roll offset function is disabled and transmitter roll data is displayed on the receiver.
2. Position the transmitter at 10 o’clock (± one-half clock position) and allow it to remain there for 10–18
seconds.
3. Slowly roll the transmitter clockwise to its 2 o’clock position (± one-half clock position) and allow it to
remain there for 10–18 seconds.
4. Slowly roll the transmitter clockwise to its 7 o’clock position (± one-half clock position).
5. Watch the receiver display to observe when all transmitter data disappears, which indicates that the
transmitter frequency has changed (this will take approximately 10–18 seconds).